Get Started with Workflows
- IDP 2.0 (New)
- IDP 1.0
If you're using Harness IDP 2.0, please ensure you have reviewed the IDP 2.0 Overview guide and are familiar with the key steps for upgrading to IDP 2.0. To enable IDP 2.0, you must raise a support ticket to activate the IDP_2_0 feature flag for your account.
Service and Infrastructure onboarding in today’s world is slow, manual and tedious. Developers often spend days—or even weeks—setting up new software and completing Day-2 operations. This inefficiency arises from either waiting for ticket resolutions (TicketOps) or manually handling repetitive tasks, which results in a poor developer experience and decreased productivity.
Harness IDP addresses these challenges with Self-Service Workflows.
Workflows enable developer self-service by automating manual tasks and processes. Using Workflows, platform engineering teams can:
- Automate new service onboarding.
- Simplify Day 2 operations for developers.
- Provide developers with golden paths to production that include guardrails and best practices.
This guide will take you through the journey of creating, configuring and executing a Workflow.
What's new for Workflows in IDP 2.0?
Harness IDP 2.0 represents a major evolution of the Internal Developer Portal, built on a Harness-native data model designed for enterprise-scale environments and robust access control. Here's what’s changing in IDP 2.0 for Workflows:
-
Harness-native Platform Hierarchy: Workflows now support Account, Org, and Project scopes, with built-in, fine-grained RBAC.
-
No YAML Required: Create and modify Workflows directly within the UI—no need to manage YAML files or deal with Git operations
Prerequisites (IDP 2.0)
Before getting started with Workflows in IDP 2.0, ensure you have the following prerequisites:
- You have reviewed the IDP 2.0 Overview and Upgrading to IDP 2.0 guide.
- IDP 2.0 is enabled behind the
IDP_2_0Feature Flag. Contact Harness Support to enable it on your account. - You should have a clear understanding of Managing Workflows and Workflow YAML to effectively configure and use the components of a Workflow.
- It's recommended to have a Harness Pipeline in place, which acts as the orchestrator for Self-Service Workflows. Learn more about setting up Harness IDP Pipelines here.
Create a Workflow (IDP 2.0)
In IDP 2.0, you can create Workflows directly from the Harness IDP UI —eliminating the need to manually manage YAML files. With this release, "inline workflows" are fully supported, allowing you to manage the entire workflow lifecycle through the UI or APIs—no Git operations required. Learn more about Self Service Workflows here.
There are two ways for you to add and create a new Workflow in your IDP:
- Create a Workflow via the Harness IDP UI: Use the Harness UI to create Workflows directly—no YAML required. This method offers a streamlined, code-free experience for adding entities.
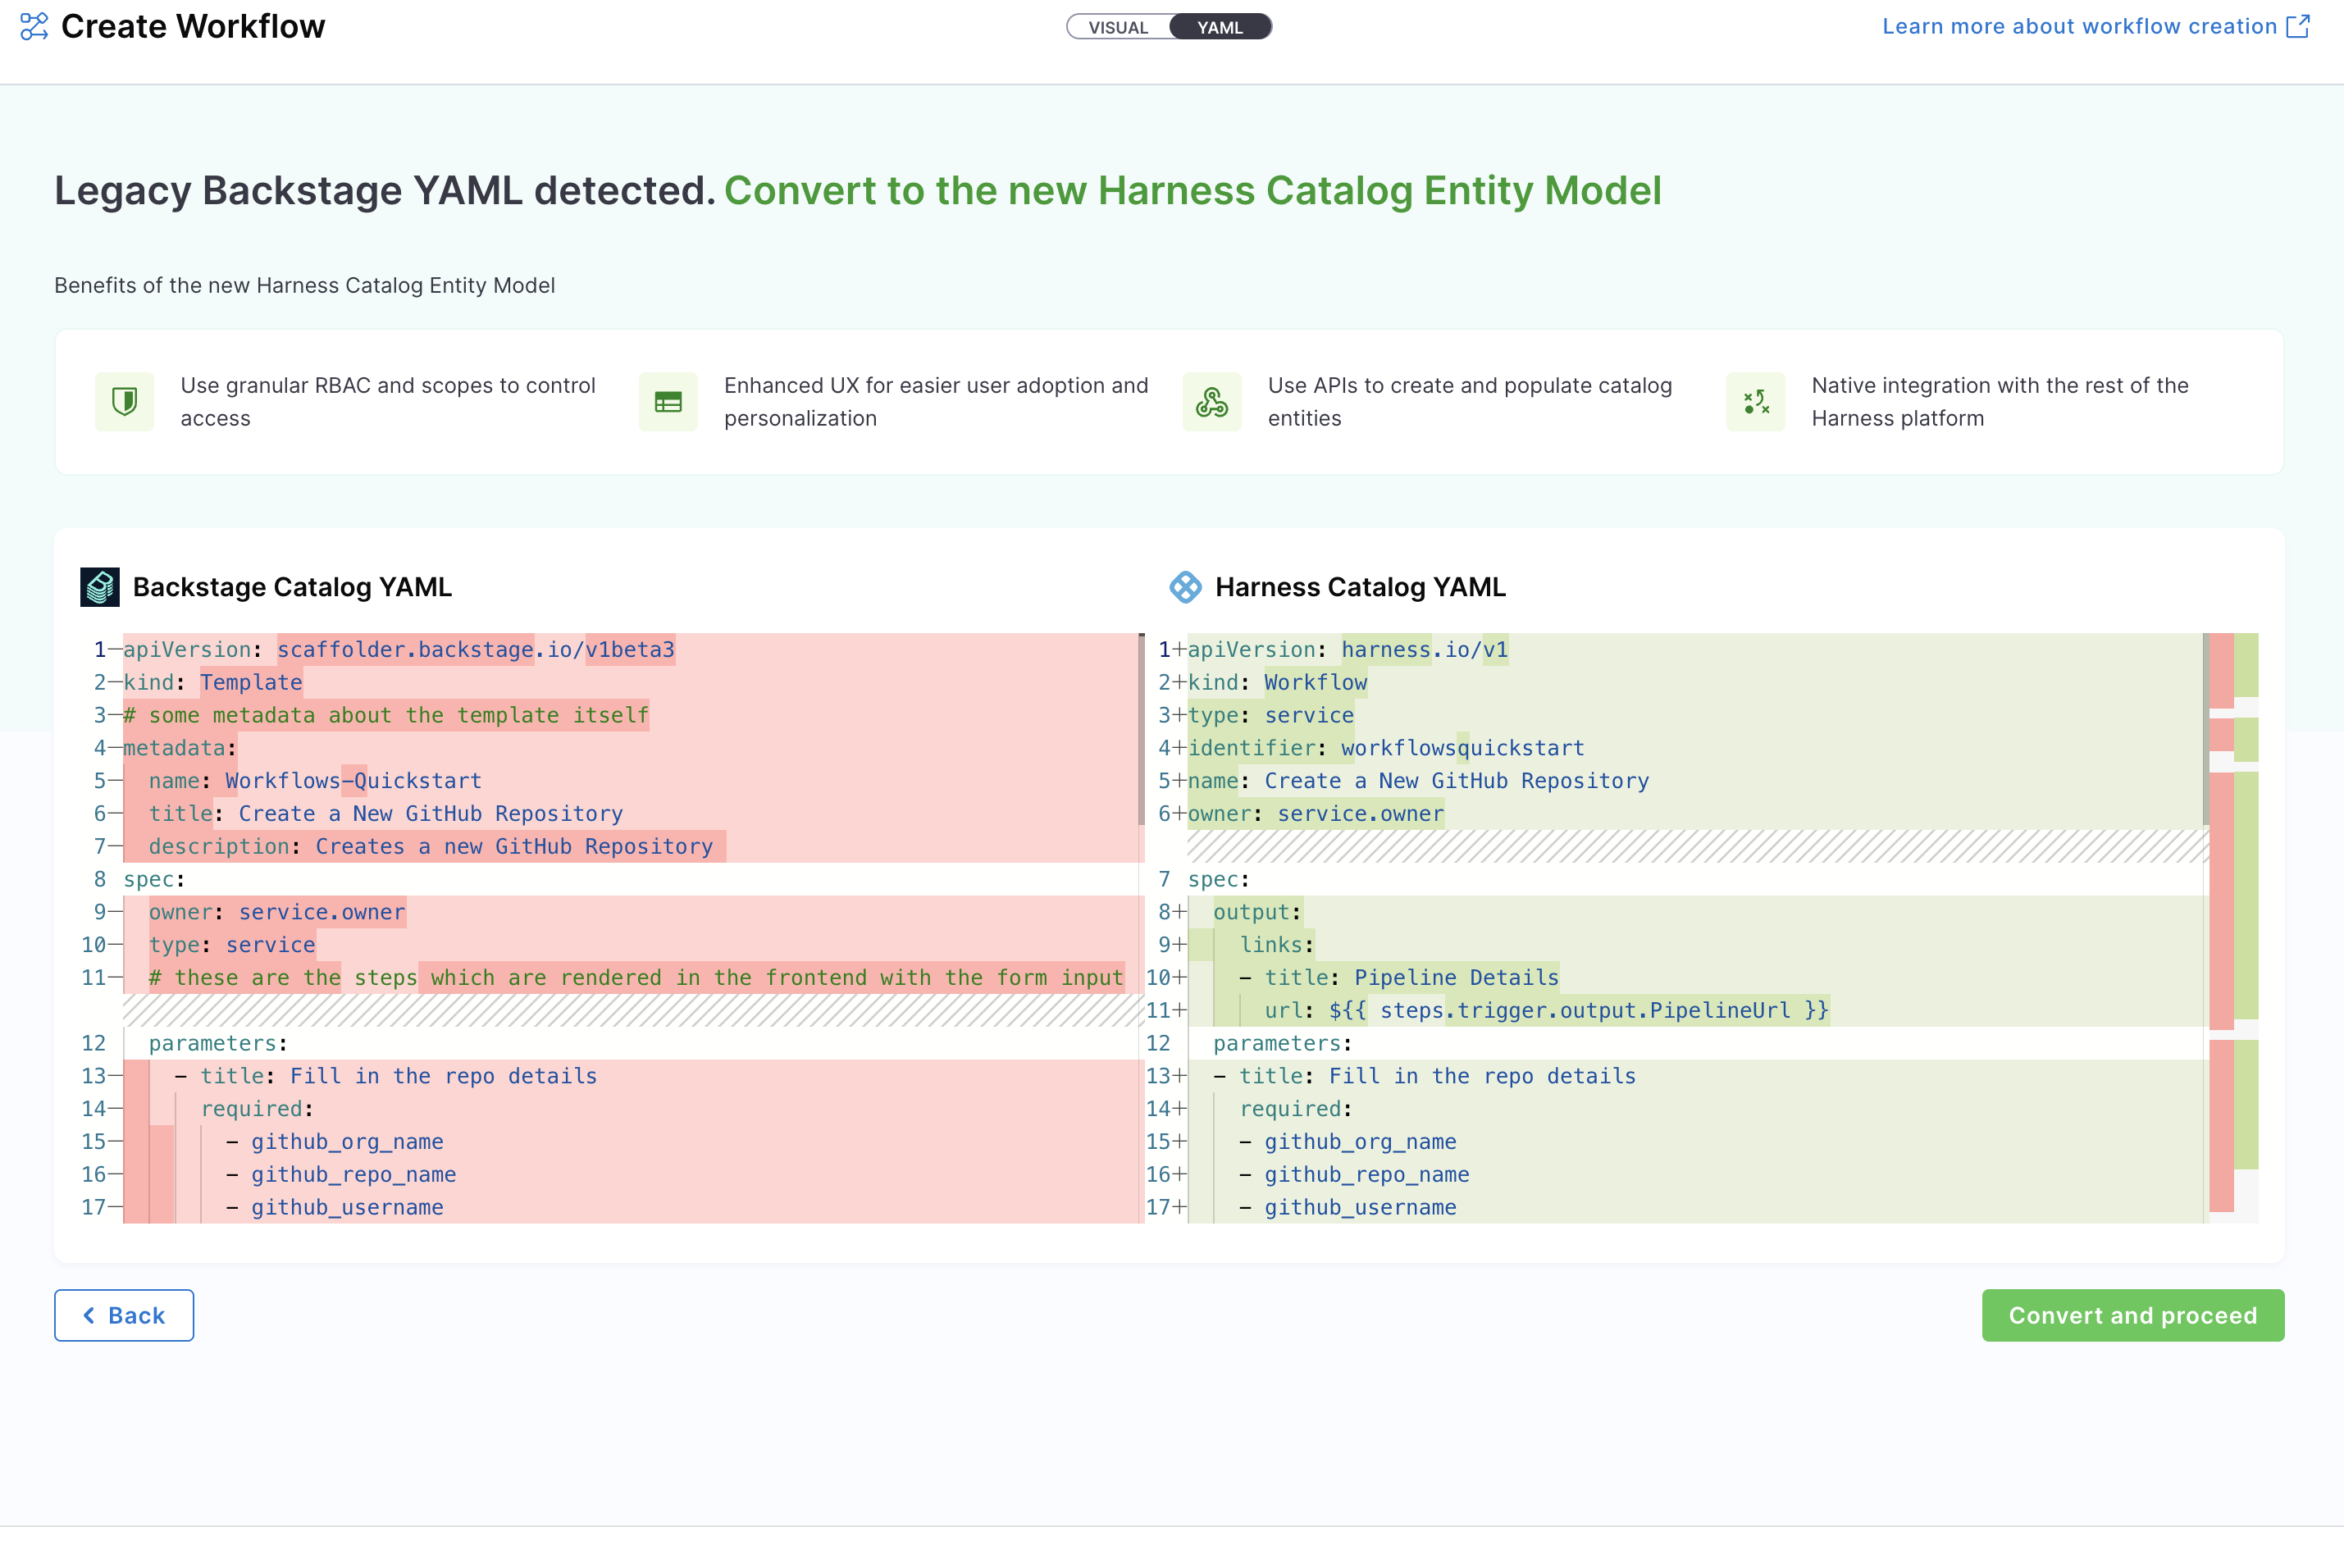
- Create a Workflow using your Workflow YAML: You can still create Workflows using your existing Workflow YAML files. Harness will automatically convert legacy Backstage YAML into the new Harness-native Data Model and register the corresponding Workflow.
Let's try creating a Workflow using both the methods:
- Harness IDP UI
- Workflow YAML
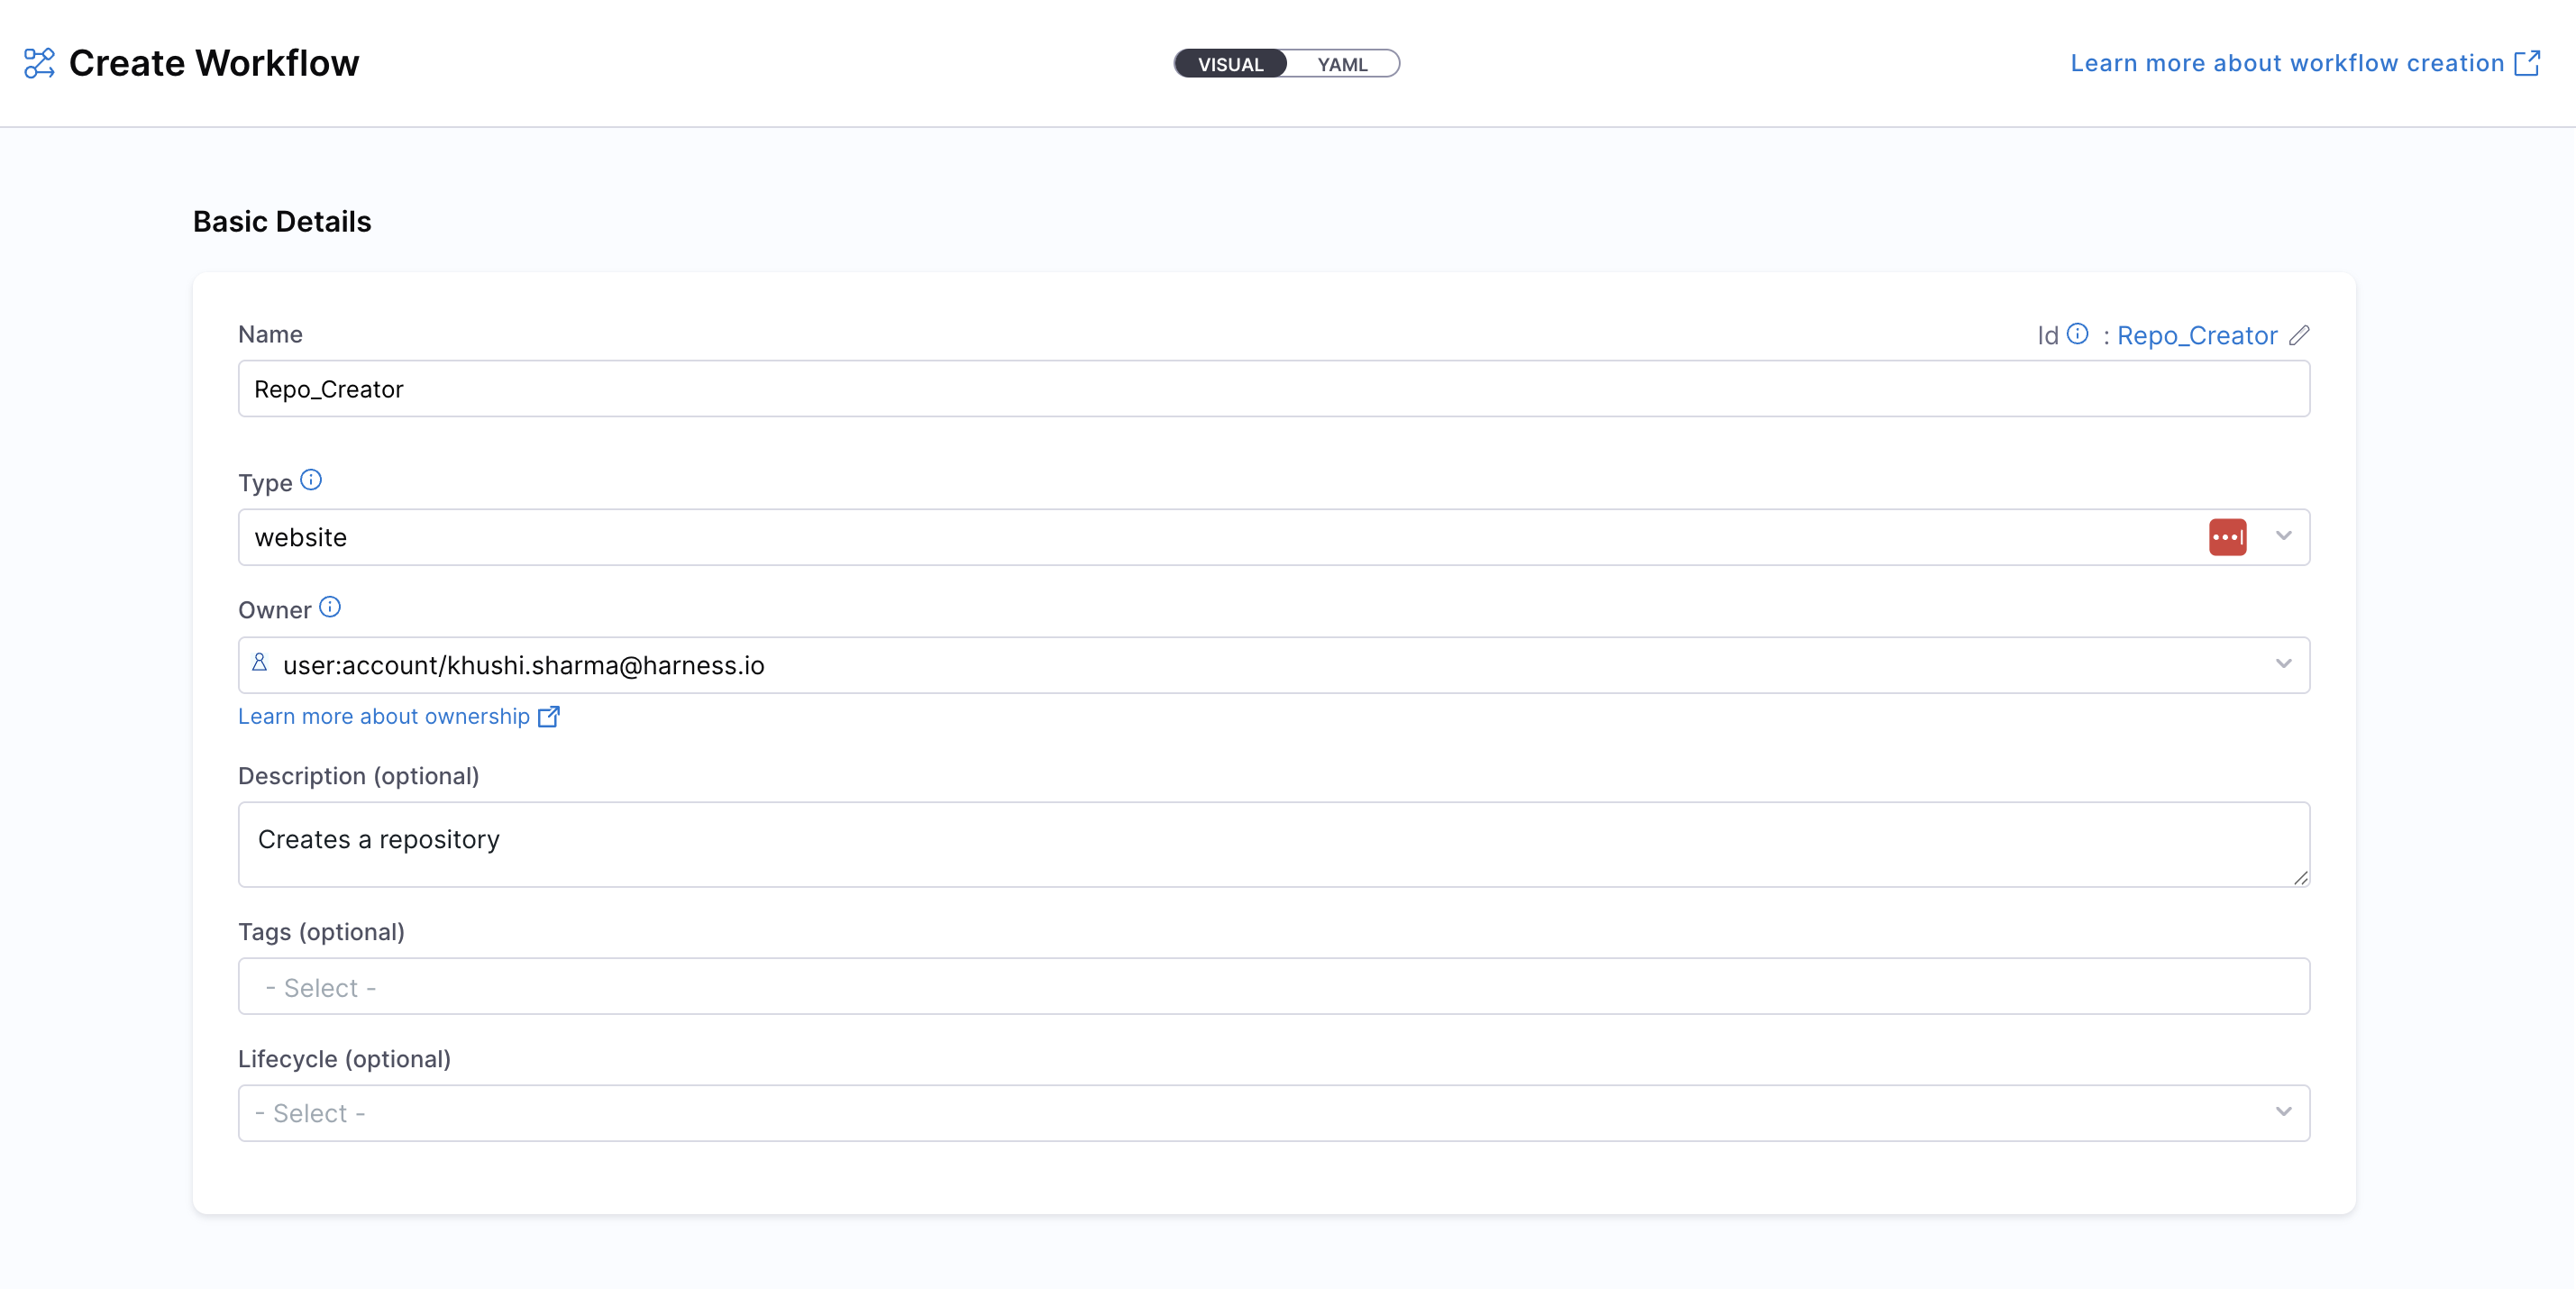
To create a new Workflow, navigate to the Harness IDP portal and click on “Create” from the side-bar menu. Choose Workflow from the panel, and follow these steps:
- You’ll be redirected to the "Visual View", where you can input basic Workflow details and begin the creation process.
- Enter the required Workflow information. The Visual view is synced in real-time with the YAML view for full transparency.
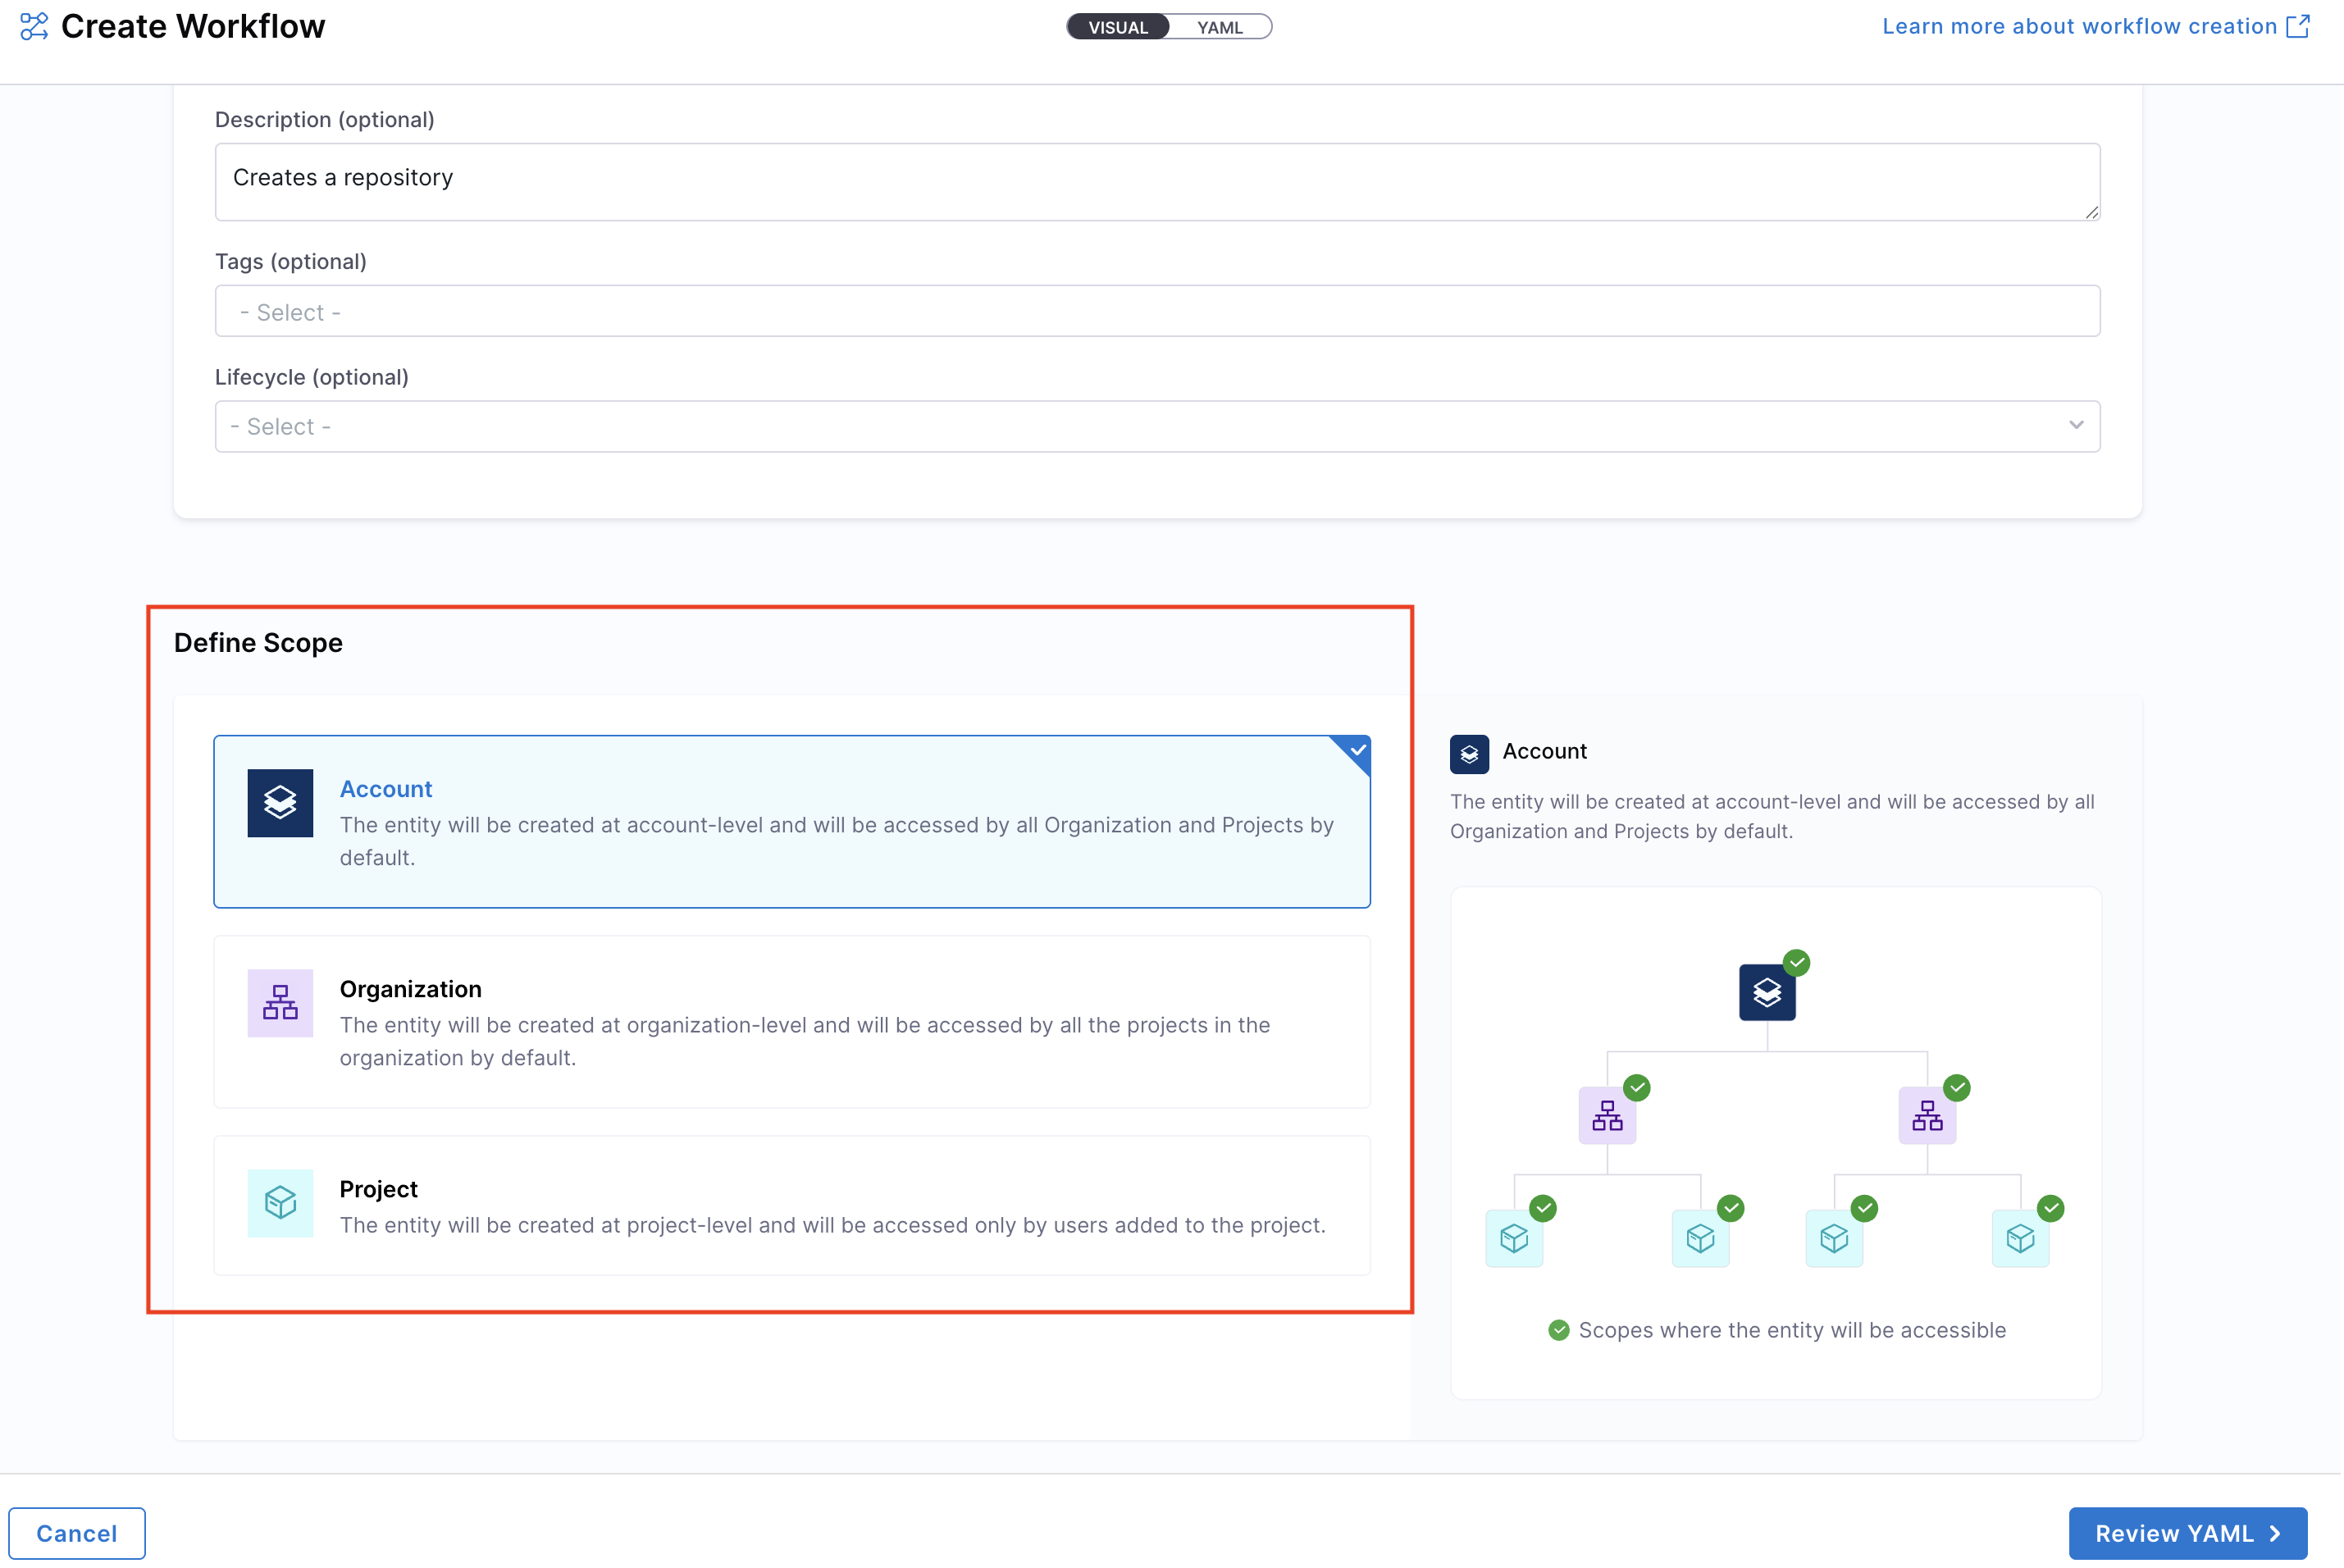
- Define the Workflow scope — choose whether the Workflow should reside at the Account, Project, or Organization level. For this use-case, let's select the Account scope. Read more about Workflow RBAC.
- Click on “Review YAML” to view the auto-generated YAML. Since there's a live sync between the Visual and YAML views, changes in one will reflect in the other.
- You can configure your Workflow by editing the YAML directly—add inputs, backend actions, and outputs as needed. This allows you to fully customize the Workflow behavior. Learn more about the components of a Workflow and its YAML structure here.
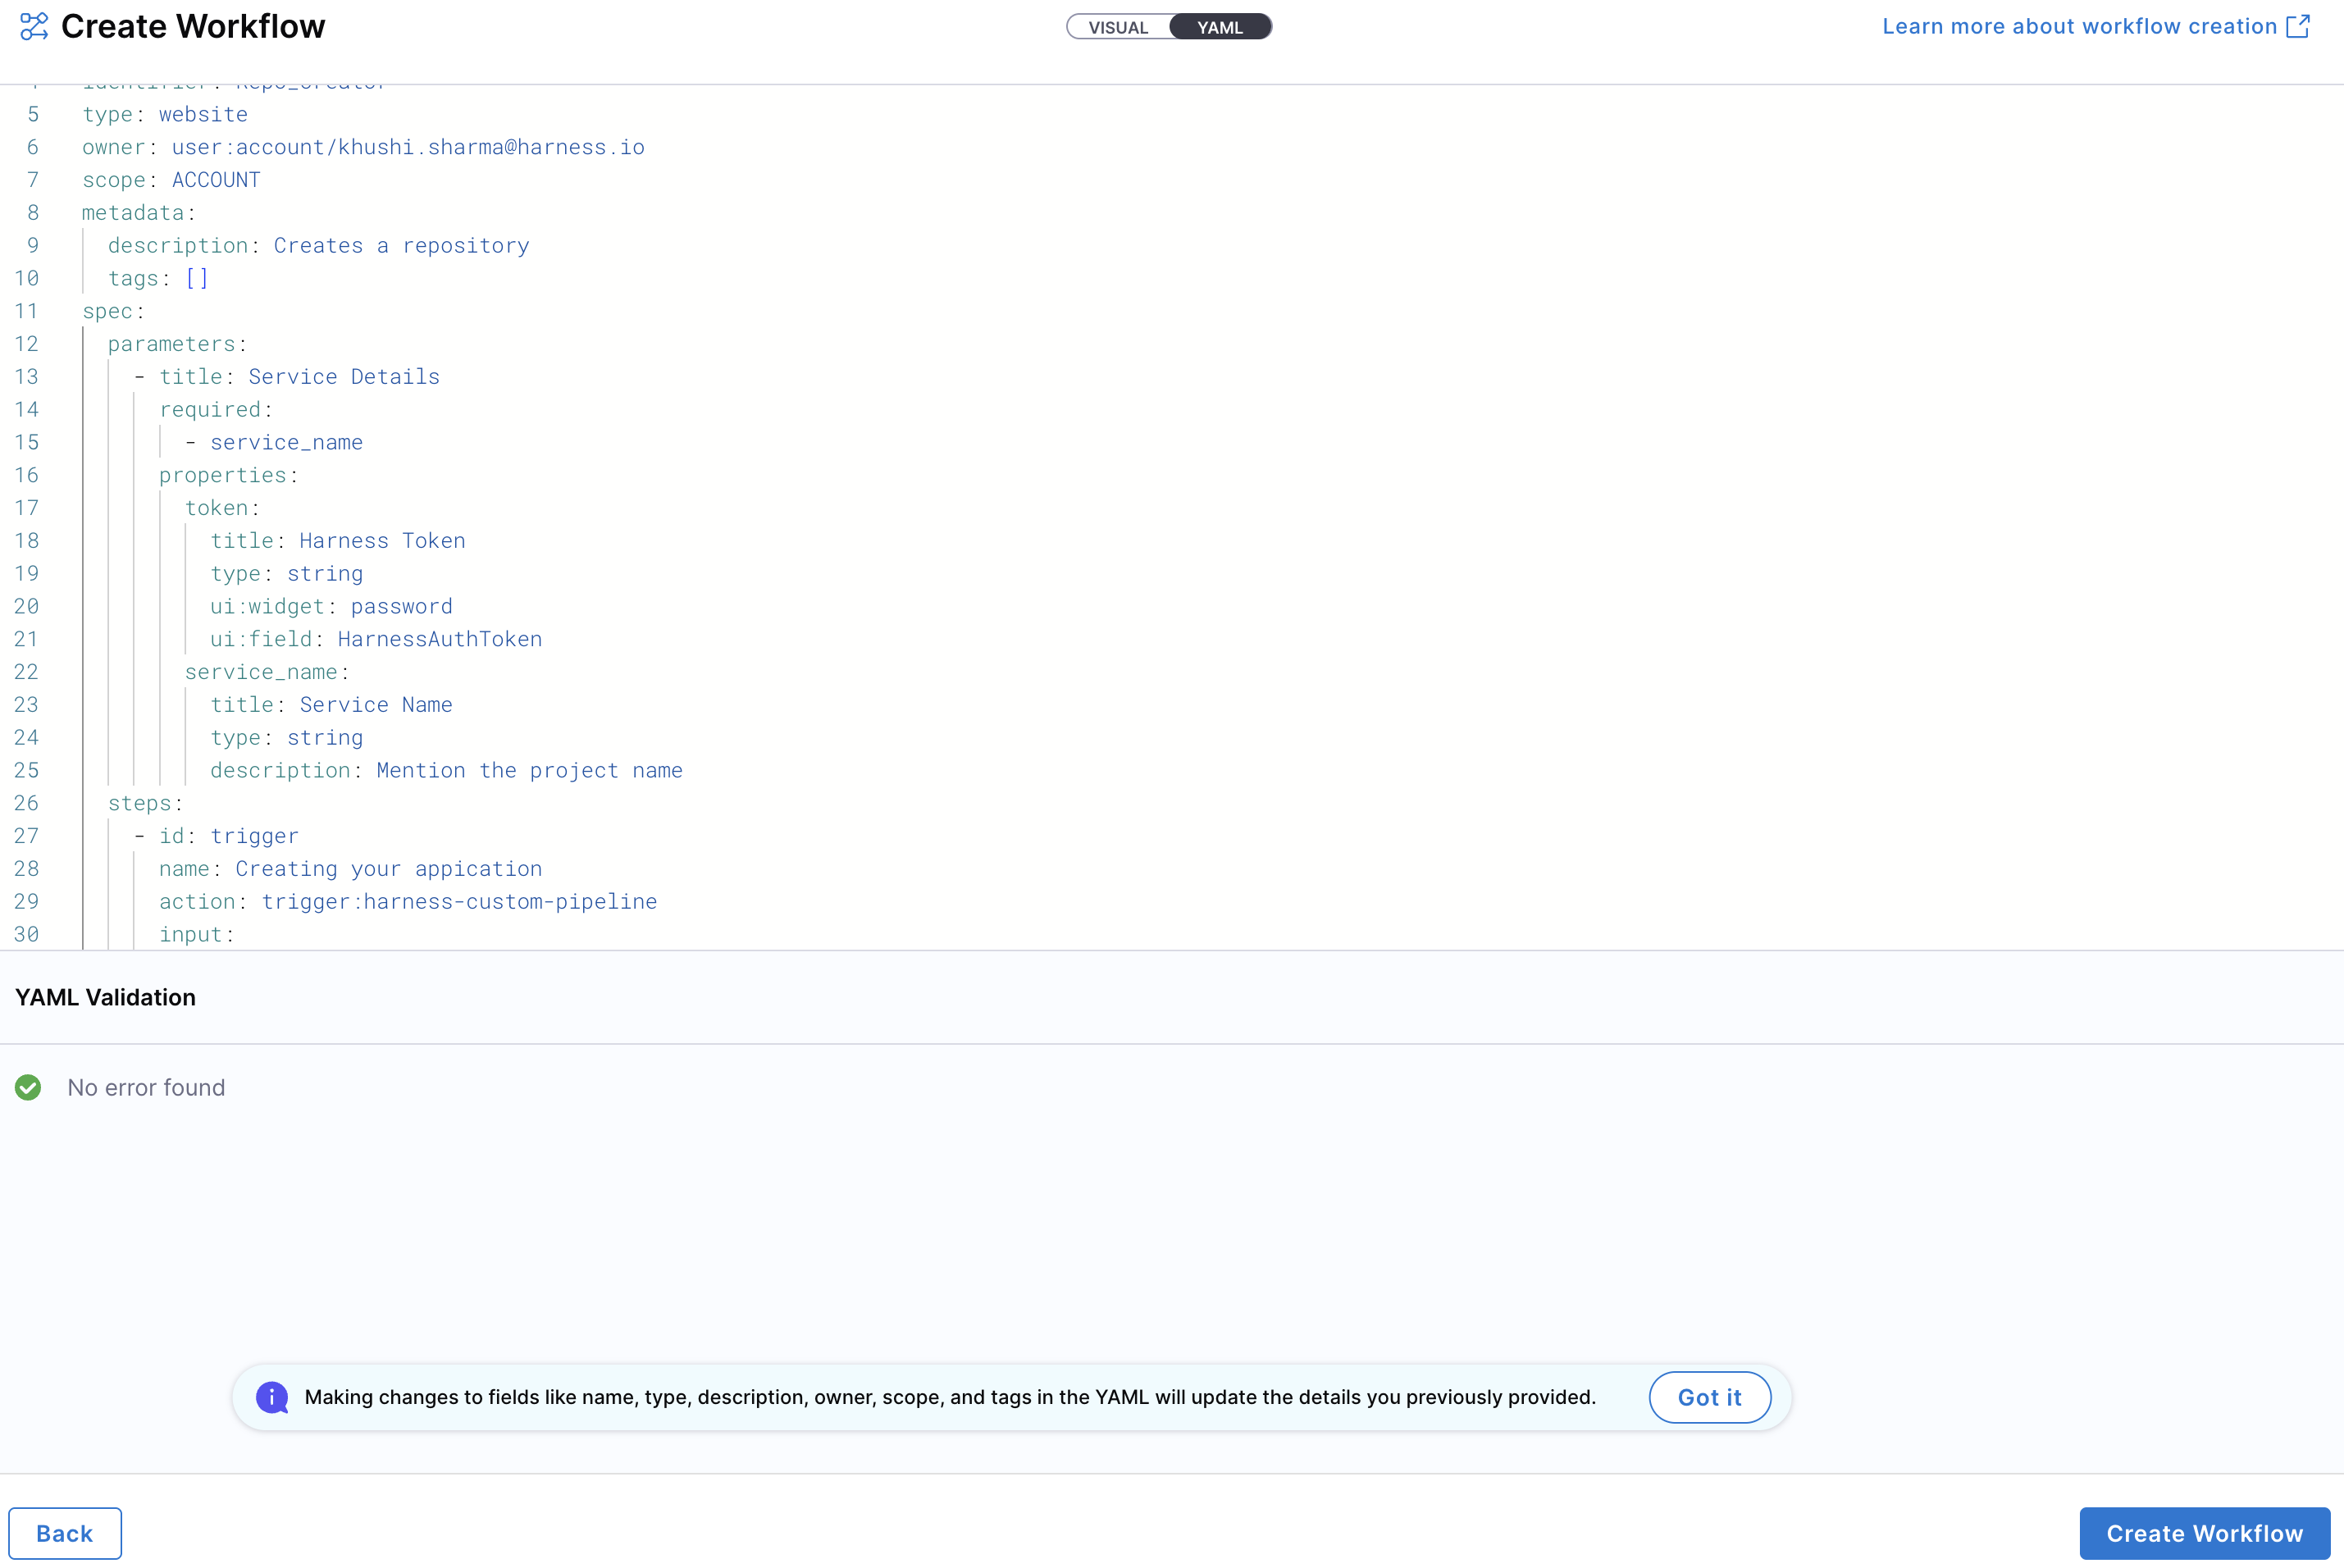
Note: YAML validation is performed to ensure compatibility with the Harness-native Data Model. Any errors will be shown in the Validation logs.
- Once everything is set, click “Create Workflow” to finalize and create the Workflow.
To create a new entity using the Workflow YAML, navigate to the Harness IDP portal and click “Create” from the side-bar menu. Choose Workflow from the panel.
If you have a legacy Backstage YAML, you can still use it to create a Workflow. Harness will automatically convert it into the Harness-native Data Model format.
- You’ll be redirected to the Visual View. You can switch to the YAML View using the toggle at the top of the screen. This allows you to directly edit the Workflow's YAML definition.

- If you’re using a legacy Backstage YAML, paste it into the YAML view. Harness will convert it into the Harness-native format automatically. You can then proceed to finalize and create the Workflow. Since the Visual and YAML views are live-synced, changes made in one view will reflect in the other.
- Define the scope of the Workflow in two ways: either switch to the Visual View and select the desired scope, or specify the projectIdentifier or orgIdentifier directly in the YAML to set the project or organization scope.
- You can configure your Workflow by editing the YAML directly—add inputs, backend actions, and outputs as needed. This allows you to fully customize the Workflow behavior. Learn more about the components of a Workflow and its YAML structure here.
Note: YAML validation is automatically performed to ensure compatibility with the Harness-native Catalog YAML model. Any validation errors will be displayed in the Validation Logs.
- Once all details are complete, click “Create Workflow” to finalize and register your Workflow in the catalog.
Execute Workflows (IDP 2.0)
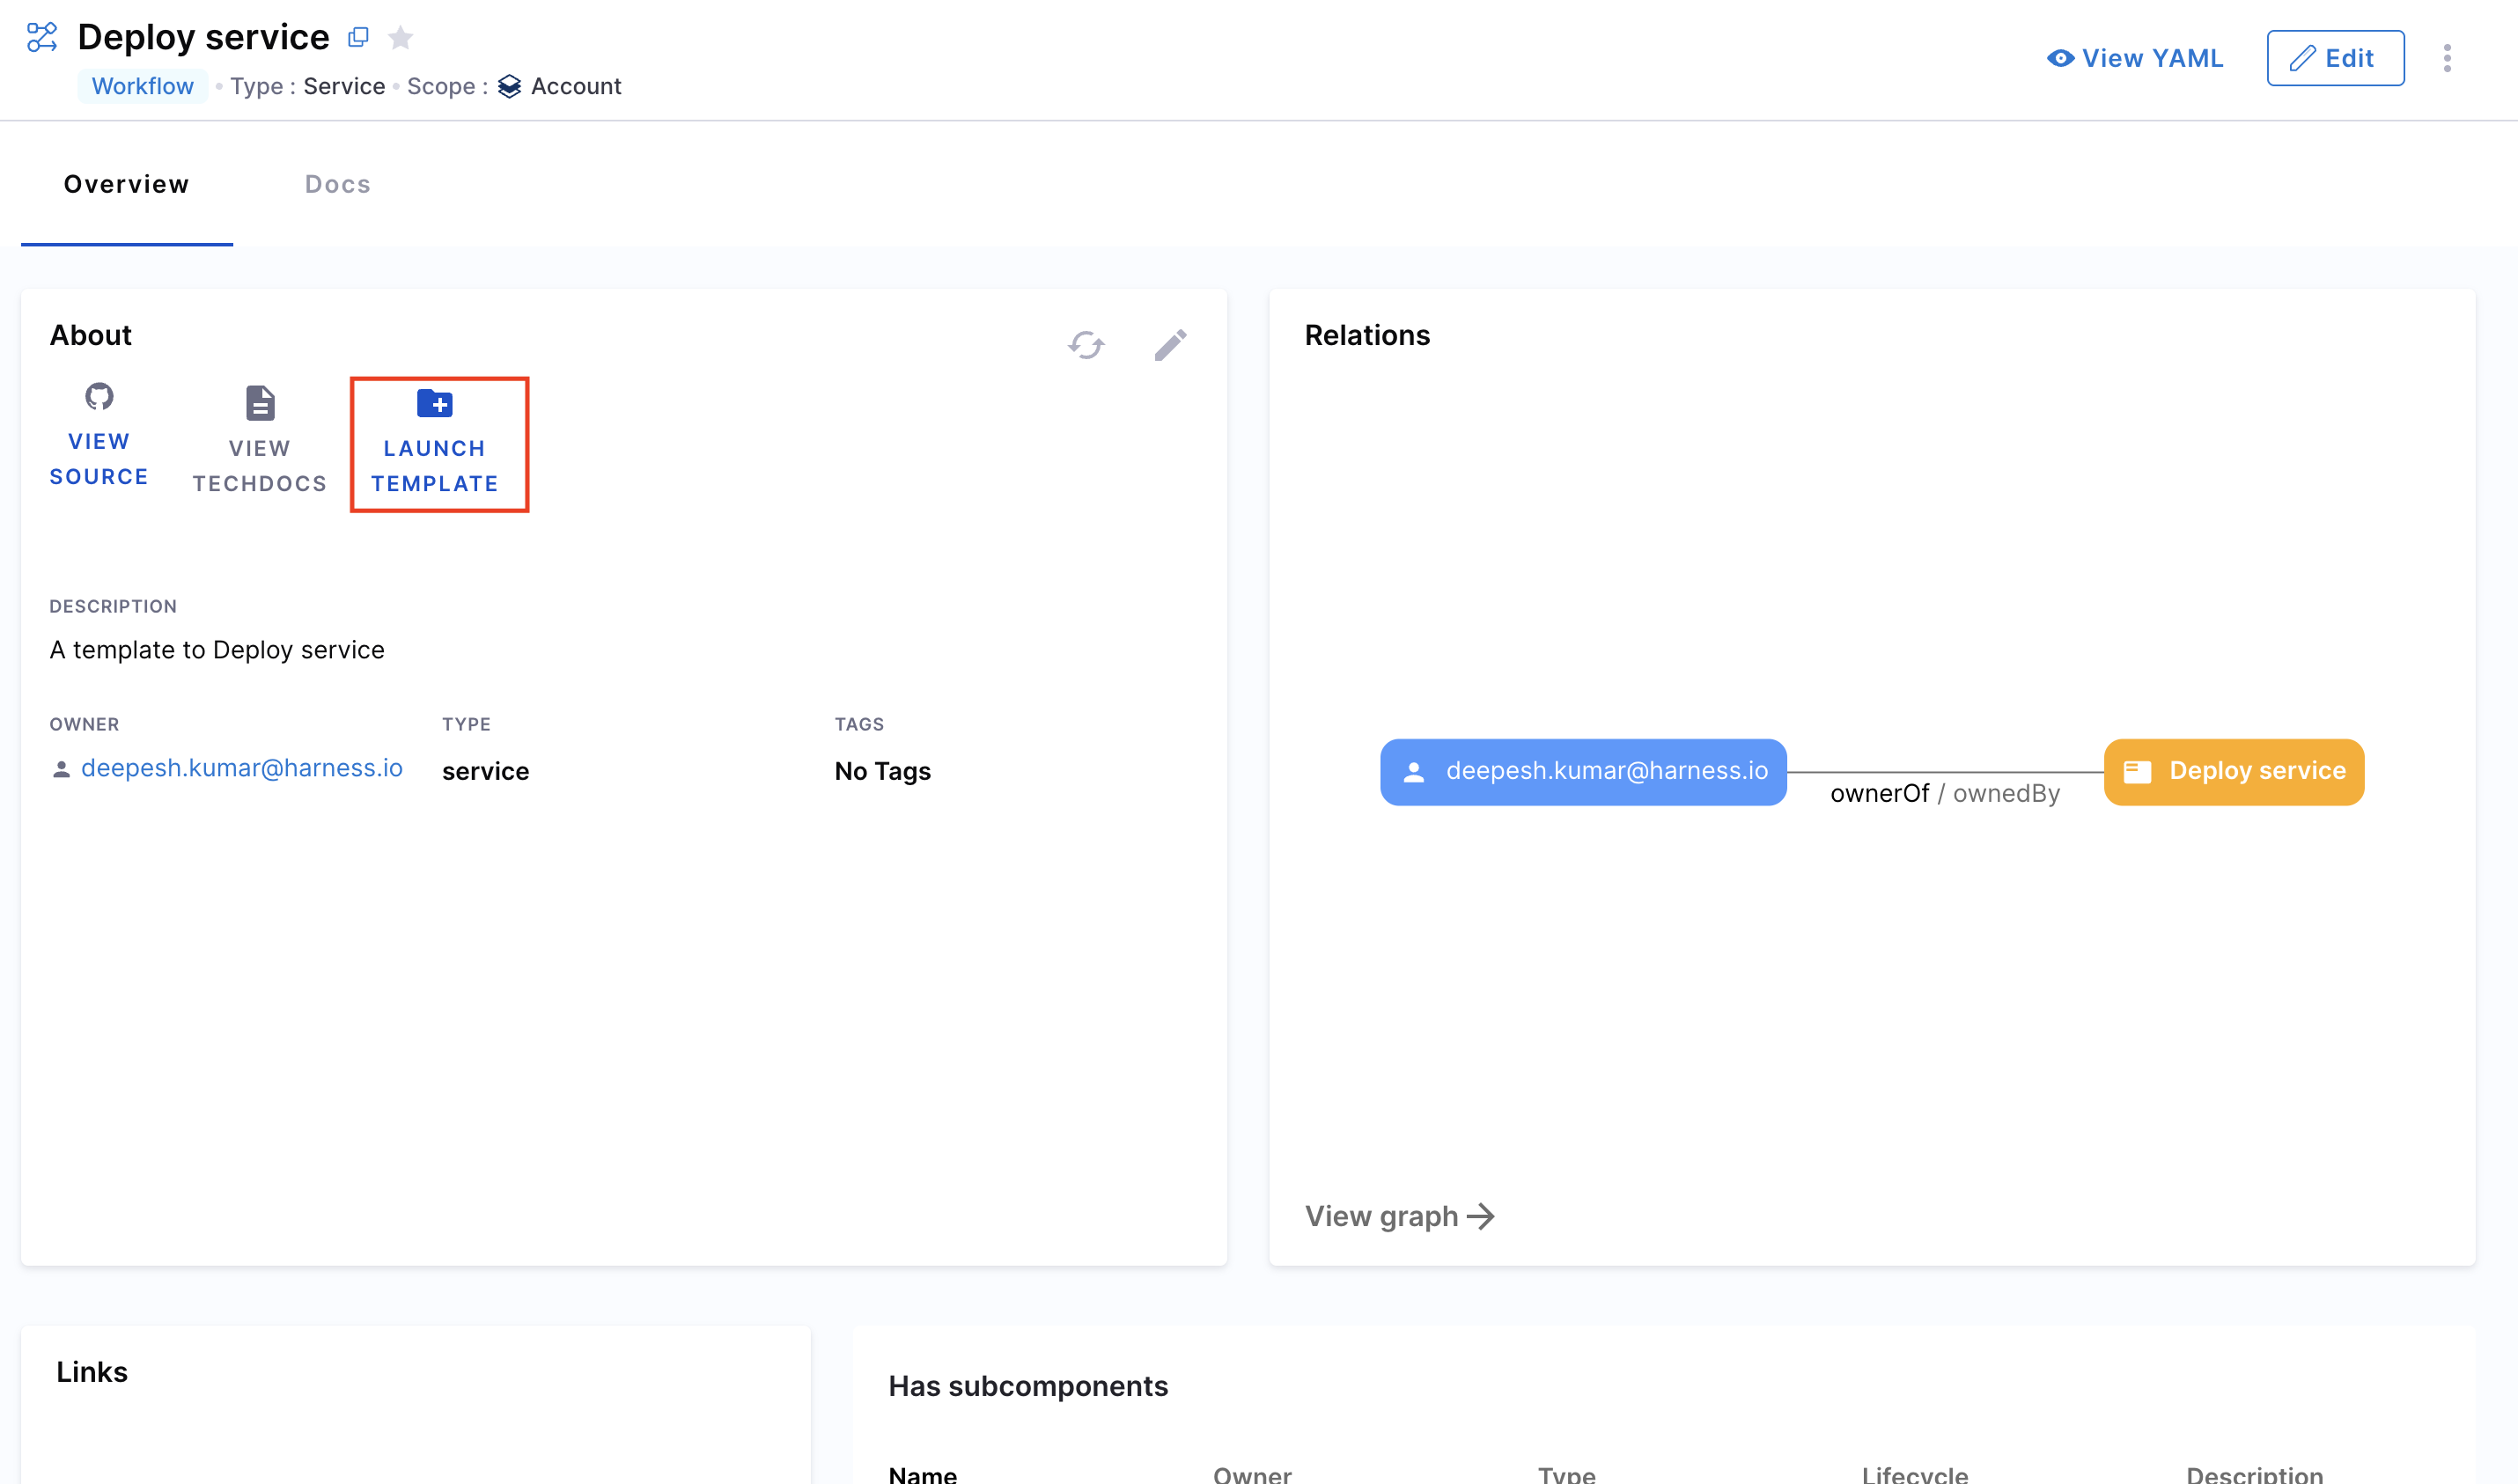
Once you've created a Workflow in IDP 2.0, you can execute it from the Workflow details page. There are two ways to access the Workflow:
- From the Catalog:
- Navigate to the Catalog and locate the relevant Workflow.
- Click on the Workflow to open its details page.
- Click Launch to execute the Workflow.
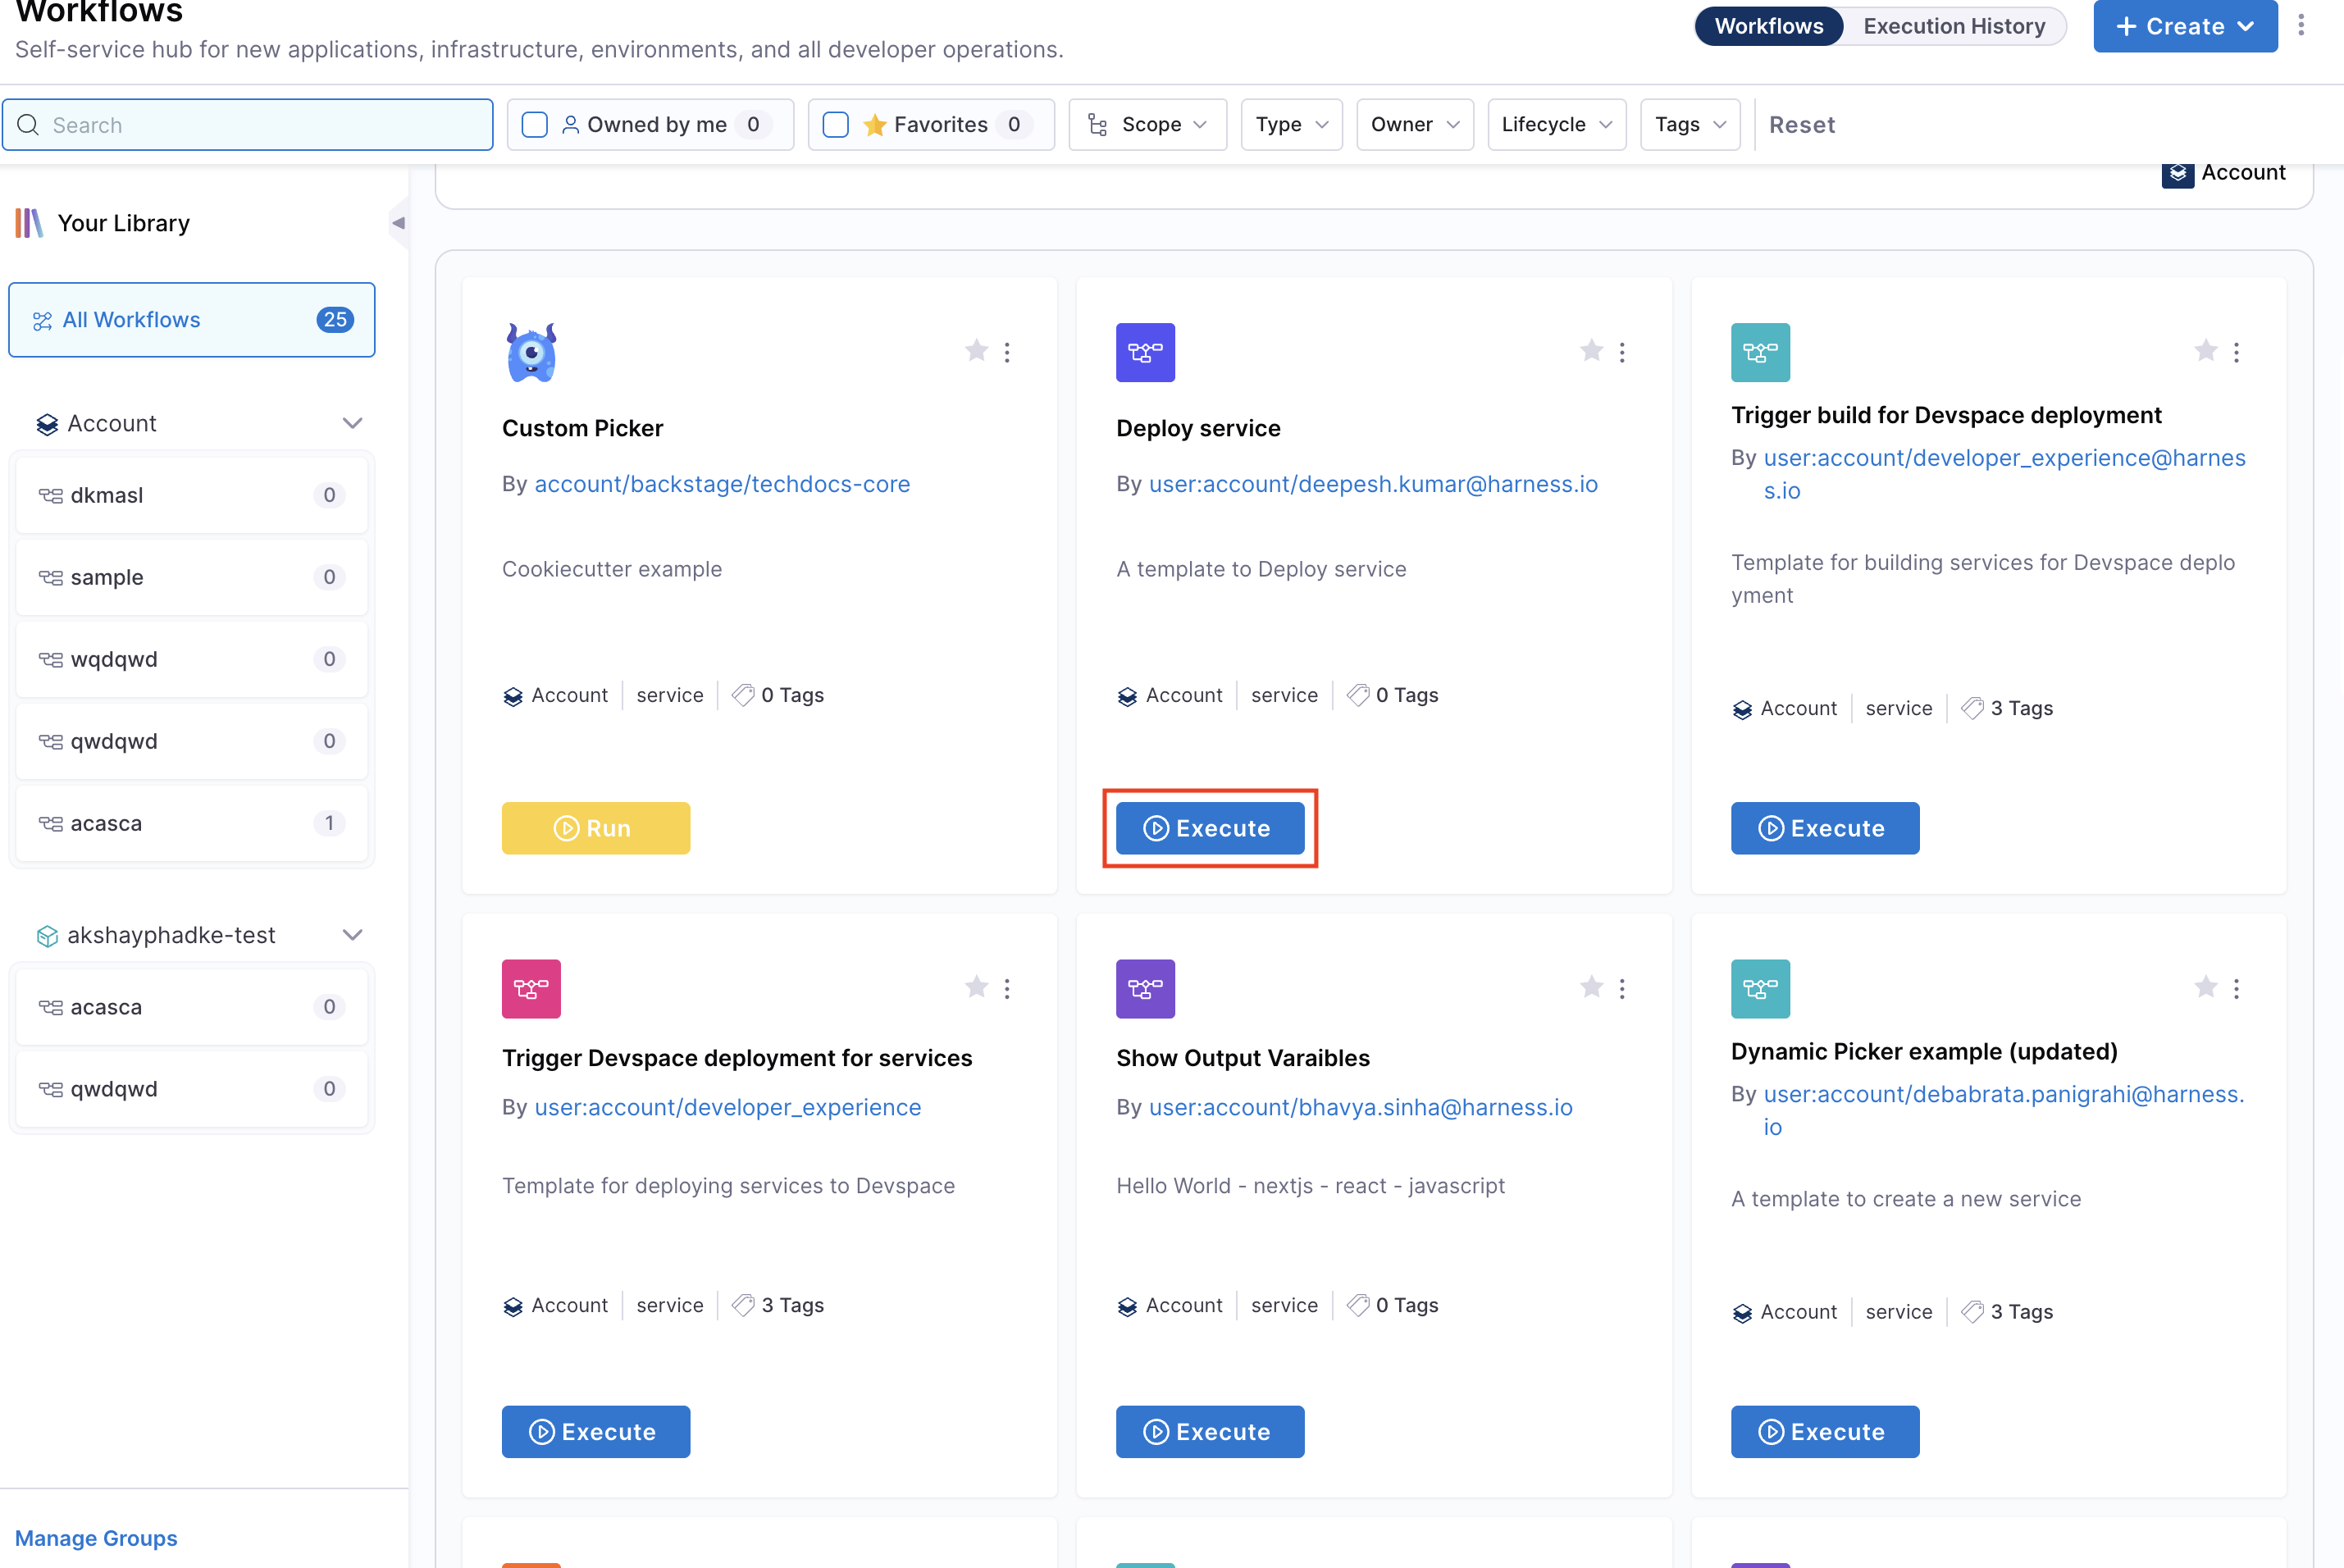
- From the Workflows Page:
- Go to the Workflows section from the main navigation.
- Find and select the desired Workflow.
- Click Launch to execute it.
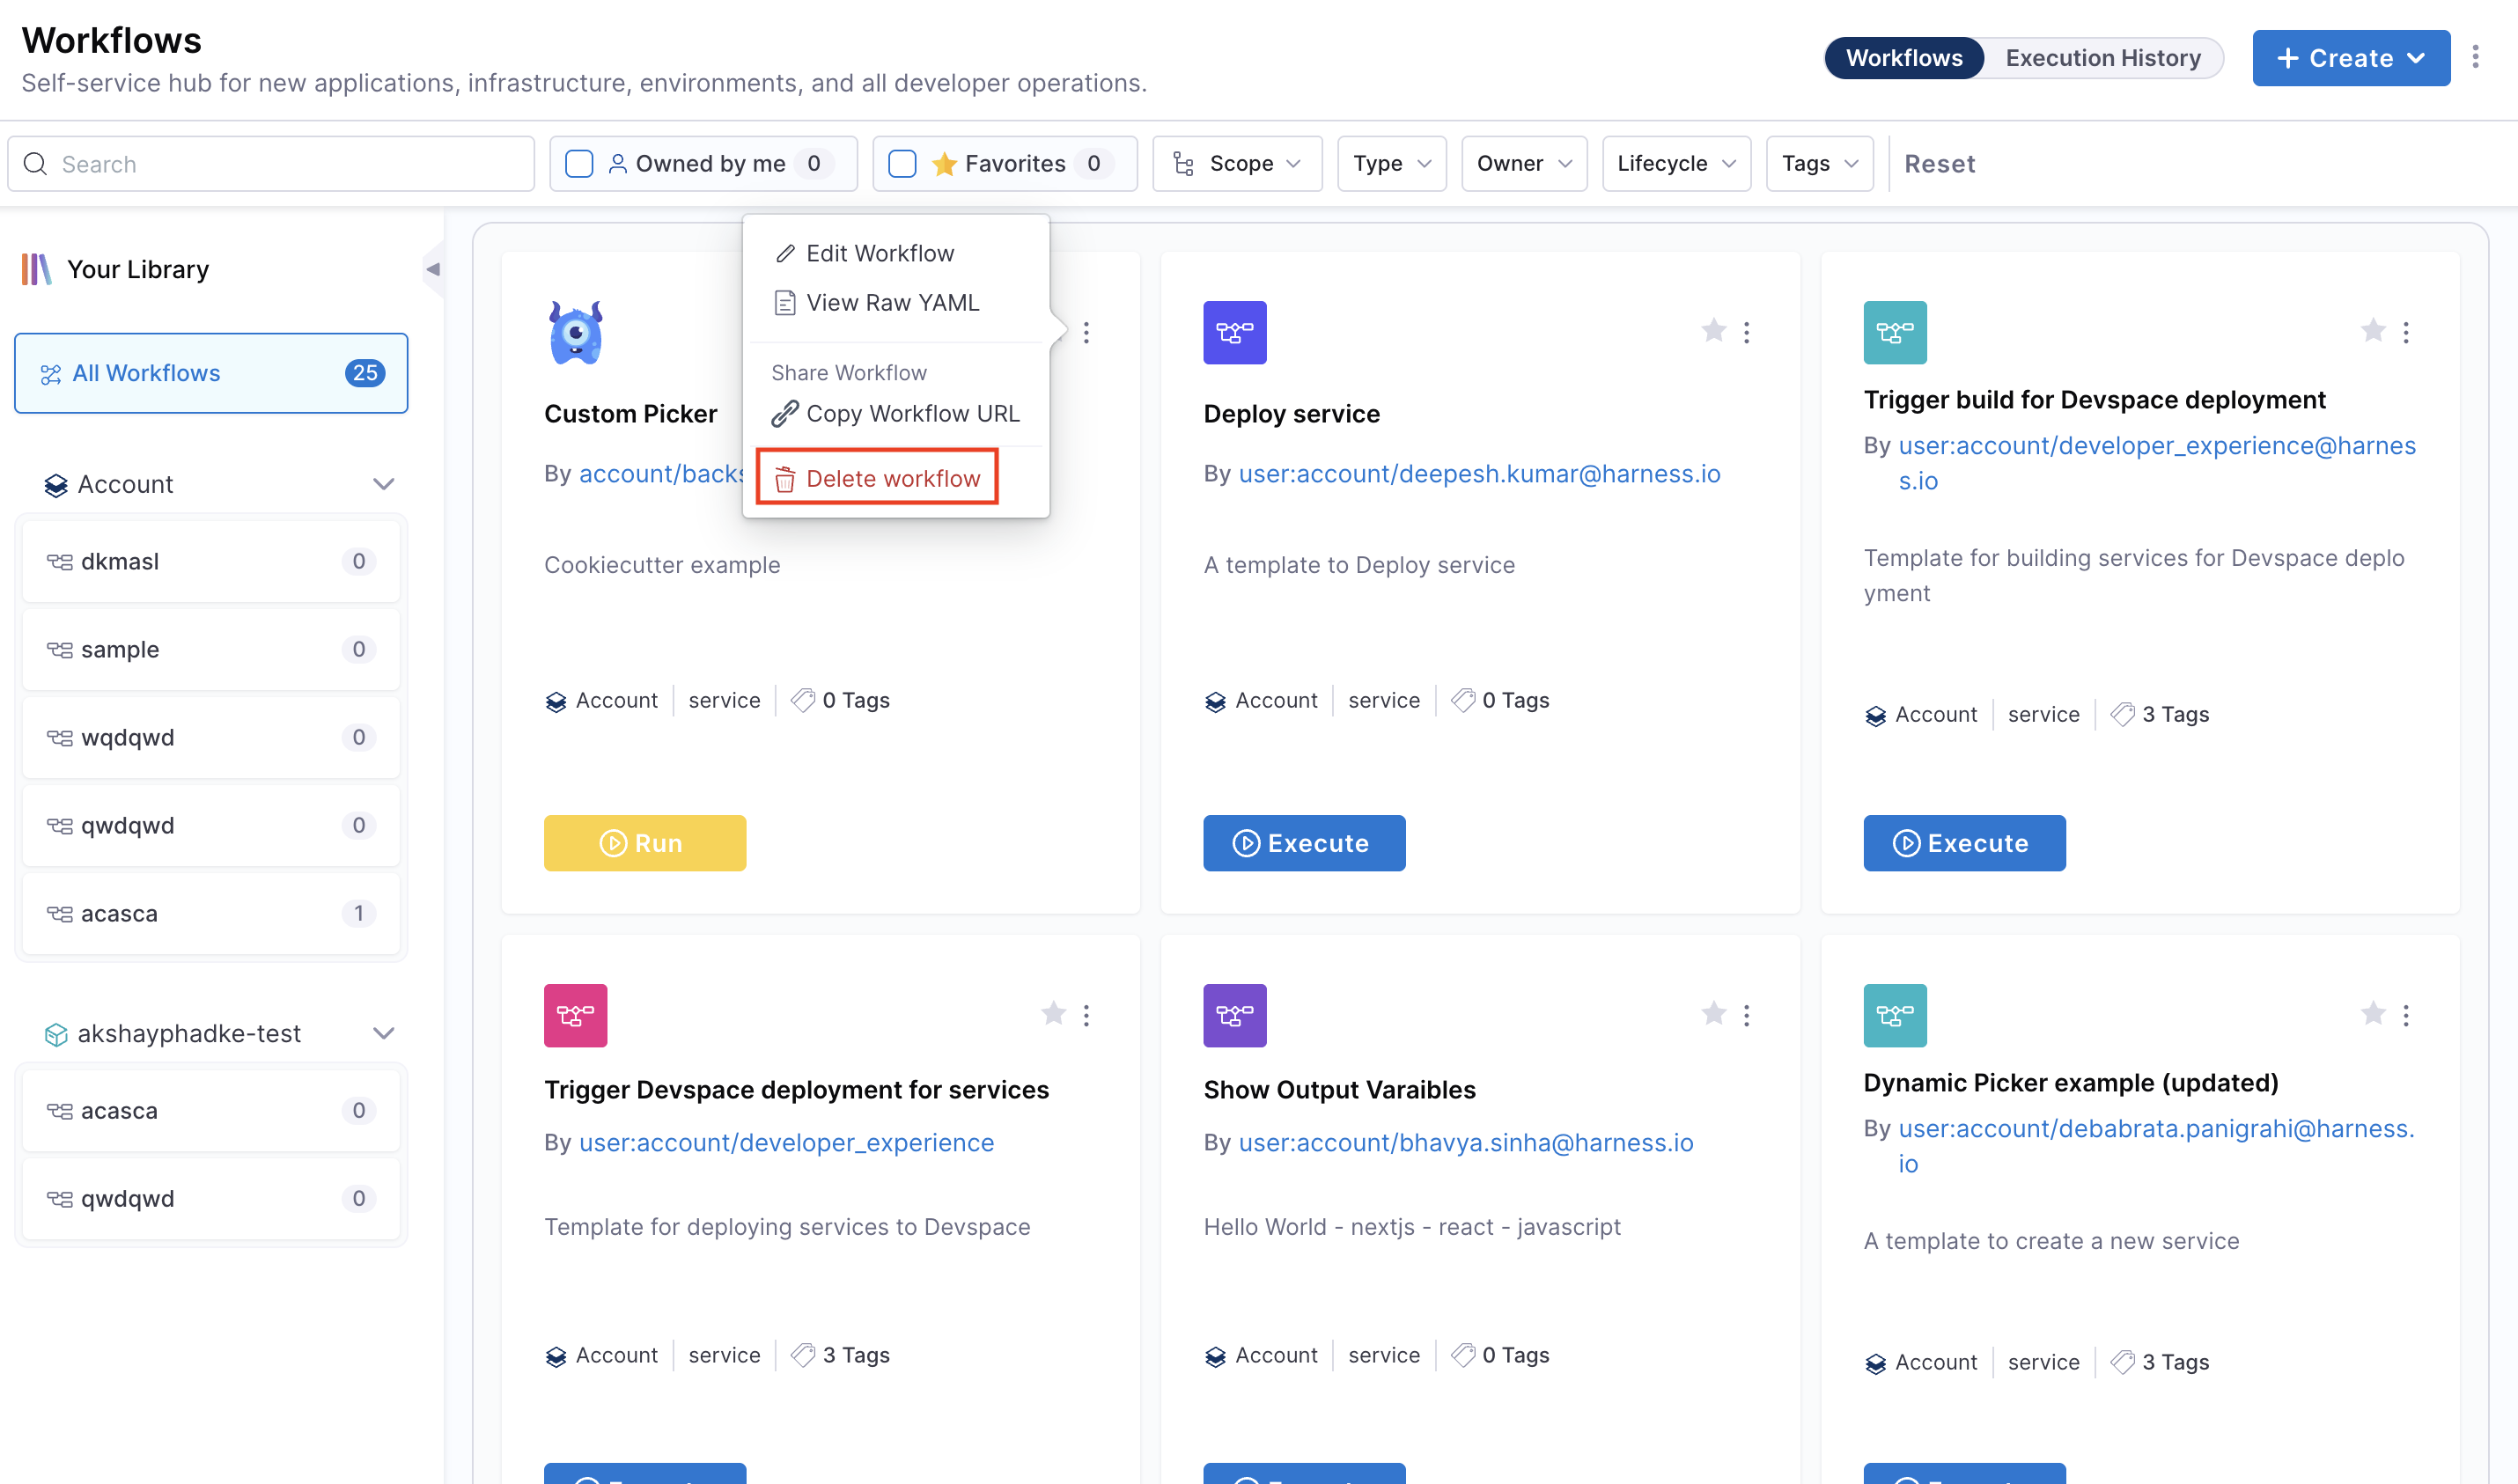
Delete a Workflow (IDP 2.0)
To delete a Workflow:
- Go to the Workflows page.
- Locate the Workflow you want to remove.
- Click the three-dot menu (•••) in the top-right corner of the Workflow card.
- Select Delete Workflow from the dropdown.
Next Steps (IDP 2.0)
Now that you've learned how to create and manage a Workflow, here's what to explore next:
- Deep dive into the Workflow YAML
- Learn how to configure Inputs, Actions and Outputs in a Workflow.
- Explore how to setup a Harness IDP Pipeline.
- Learn how to configure RBAC for Workflows.
This quickstart tutorial will guide you through setting up a Workflow in IDP to automate GitHub repository onboarding for users. While this tutorial uses GitHub as the git provider, the same steps can be applied to other git providers as well.
We now have a new Workflows homepage which is behind a Feature Flag IDP_ENABLE_WORKFLOWSV2. To enable the feature flag, please contact Harness Support
Prerequisites (IDP 1.0)
Add Connector
A connector with Git credentials that has appropriate write permissions is required to create a repository in your GitHub organization.
- Go to Admin -> Git Integrations.
- Add a New Git Integration with type as GitHub.
- Now Select the GitHub Connector and Save Changes, follow the steps to add a new connector
Make sure the Connector URL used here is pointed towards the org where you want to create the new repo and the token used have write permission for the repo also Enable the API while creating connector.
Create Harness Pipeline with IDP Stage (IDP 1.0)
A Harness Pipeline serves as an orchestrator for IDP Workflows.
- Go to Admin -> Select Project.
- Now start with Create a Pipeline.
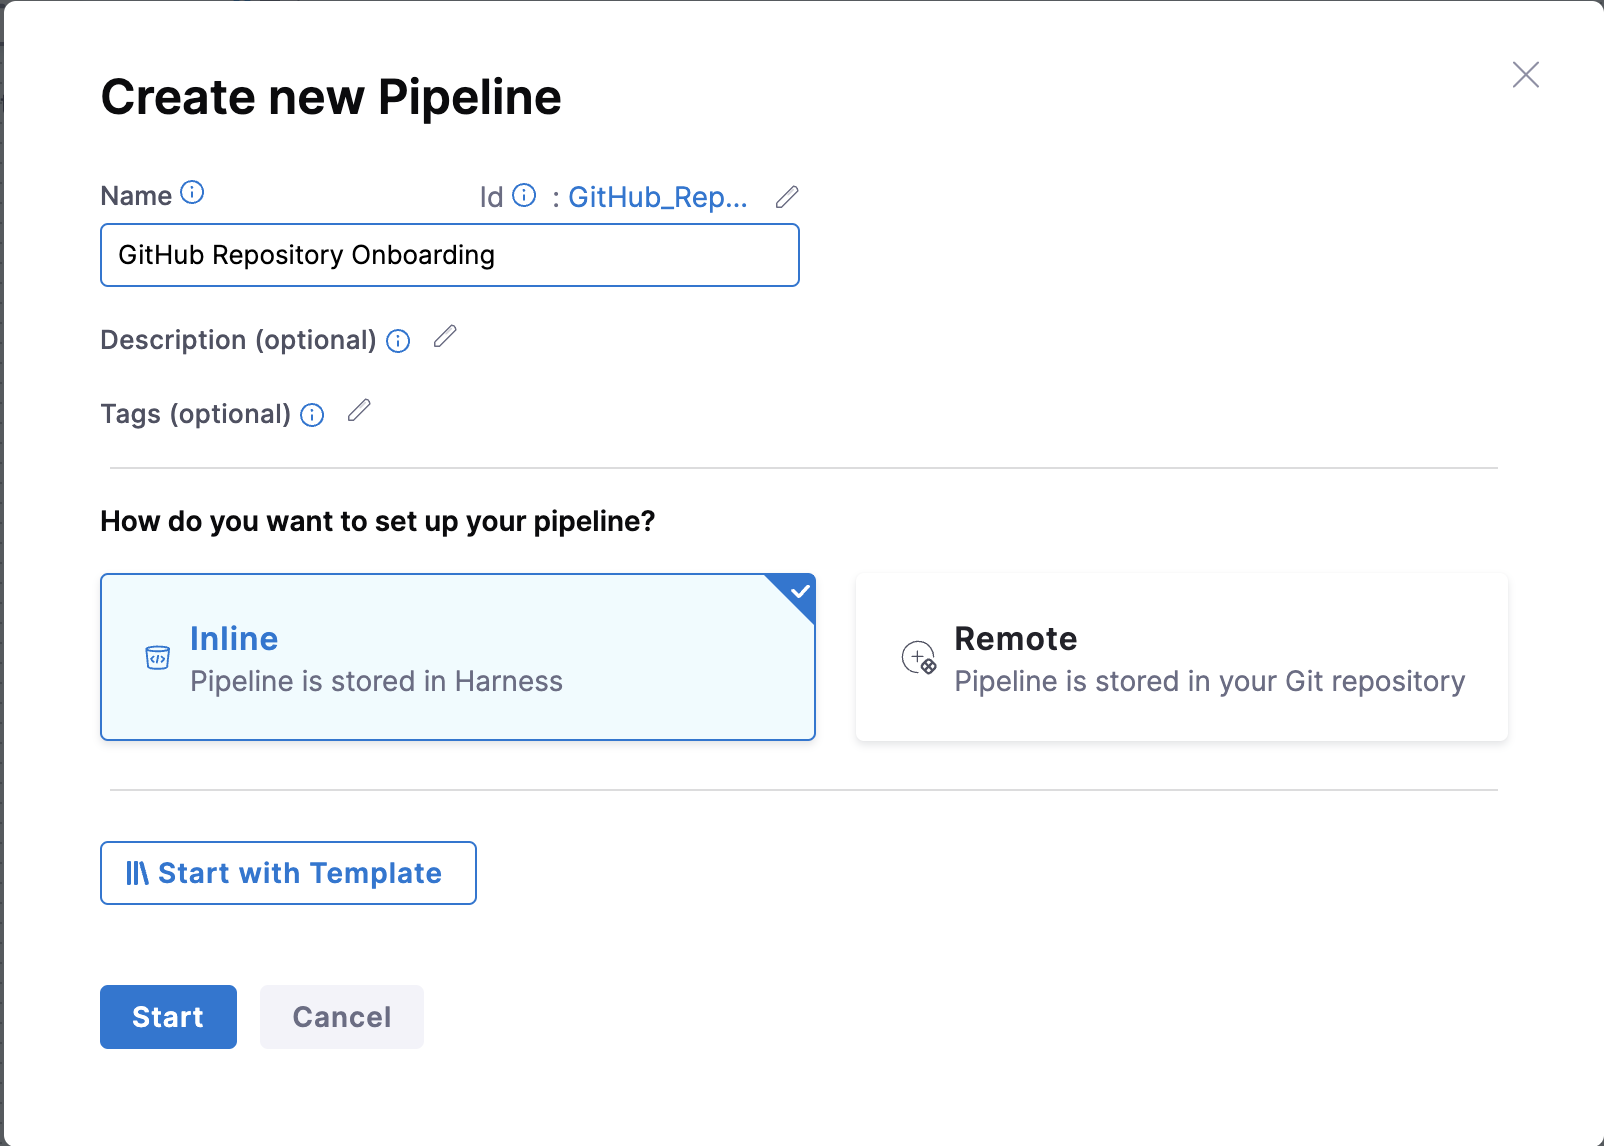
- Add a Name, select the type as Inline and Continue.
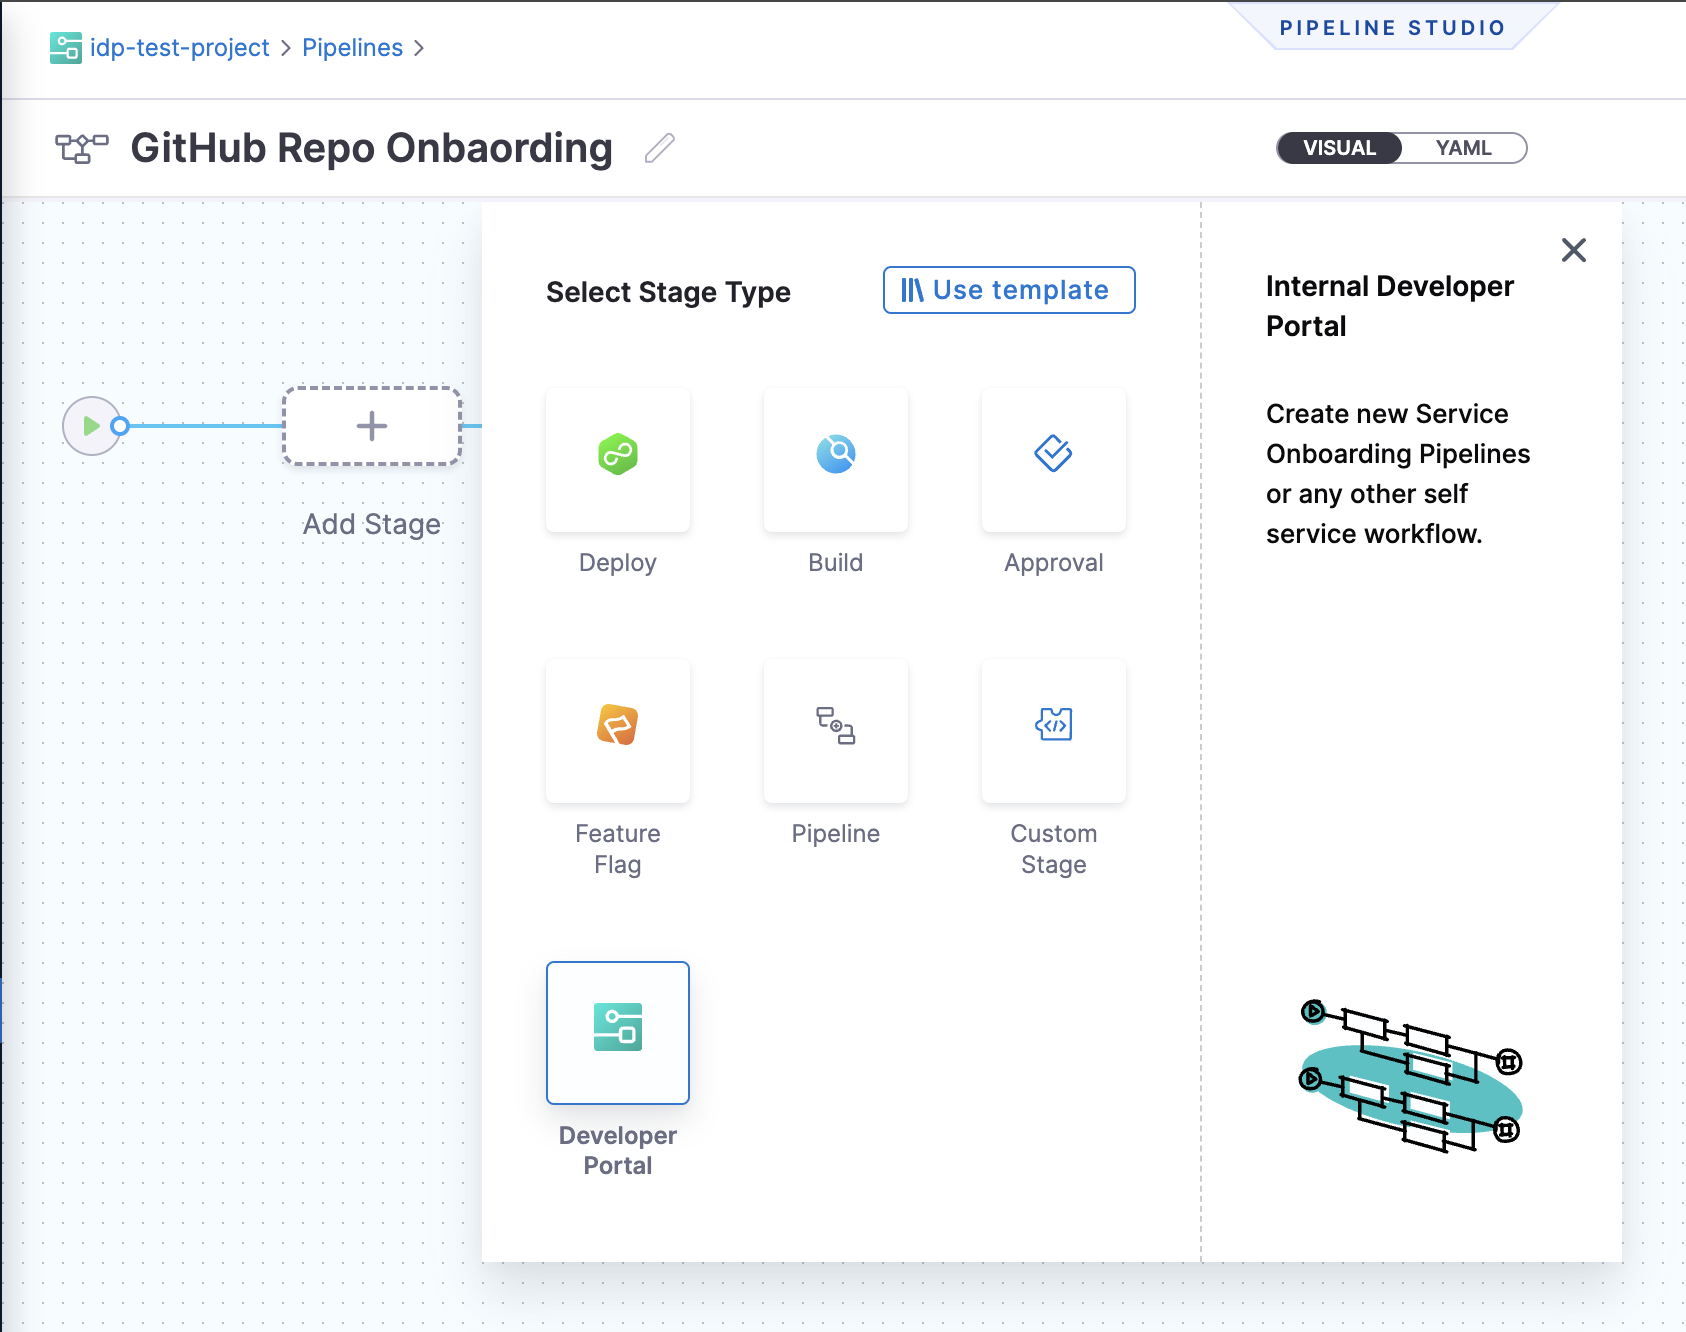
- Add Stage and Select Stage Type as Developer Portal.
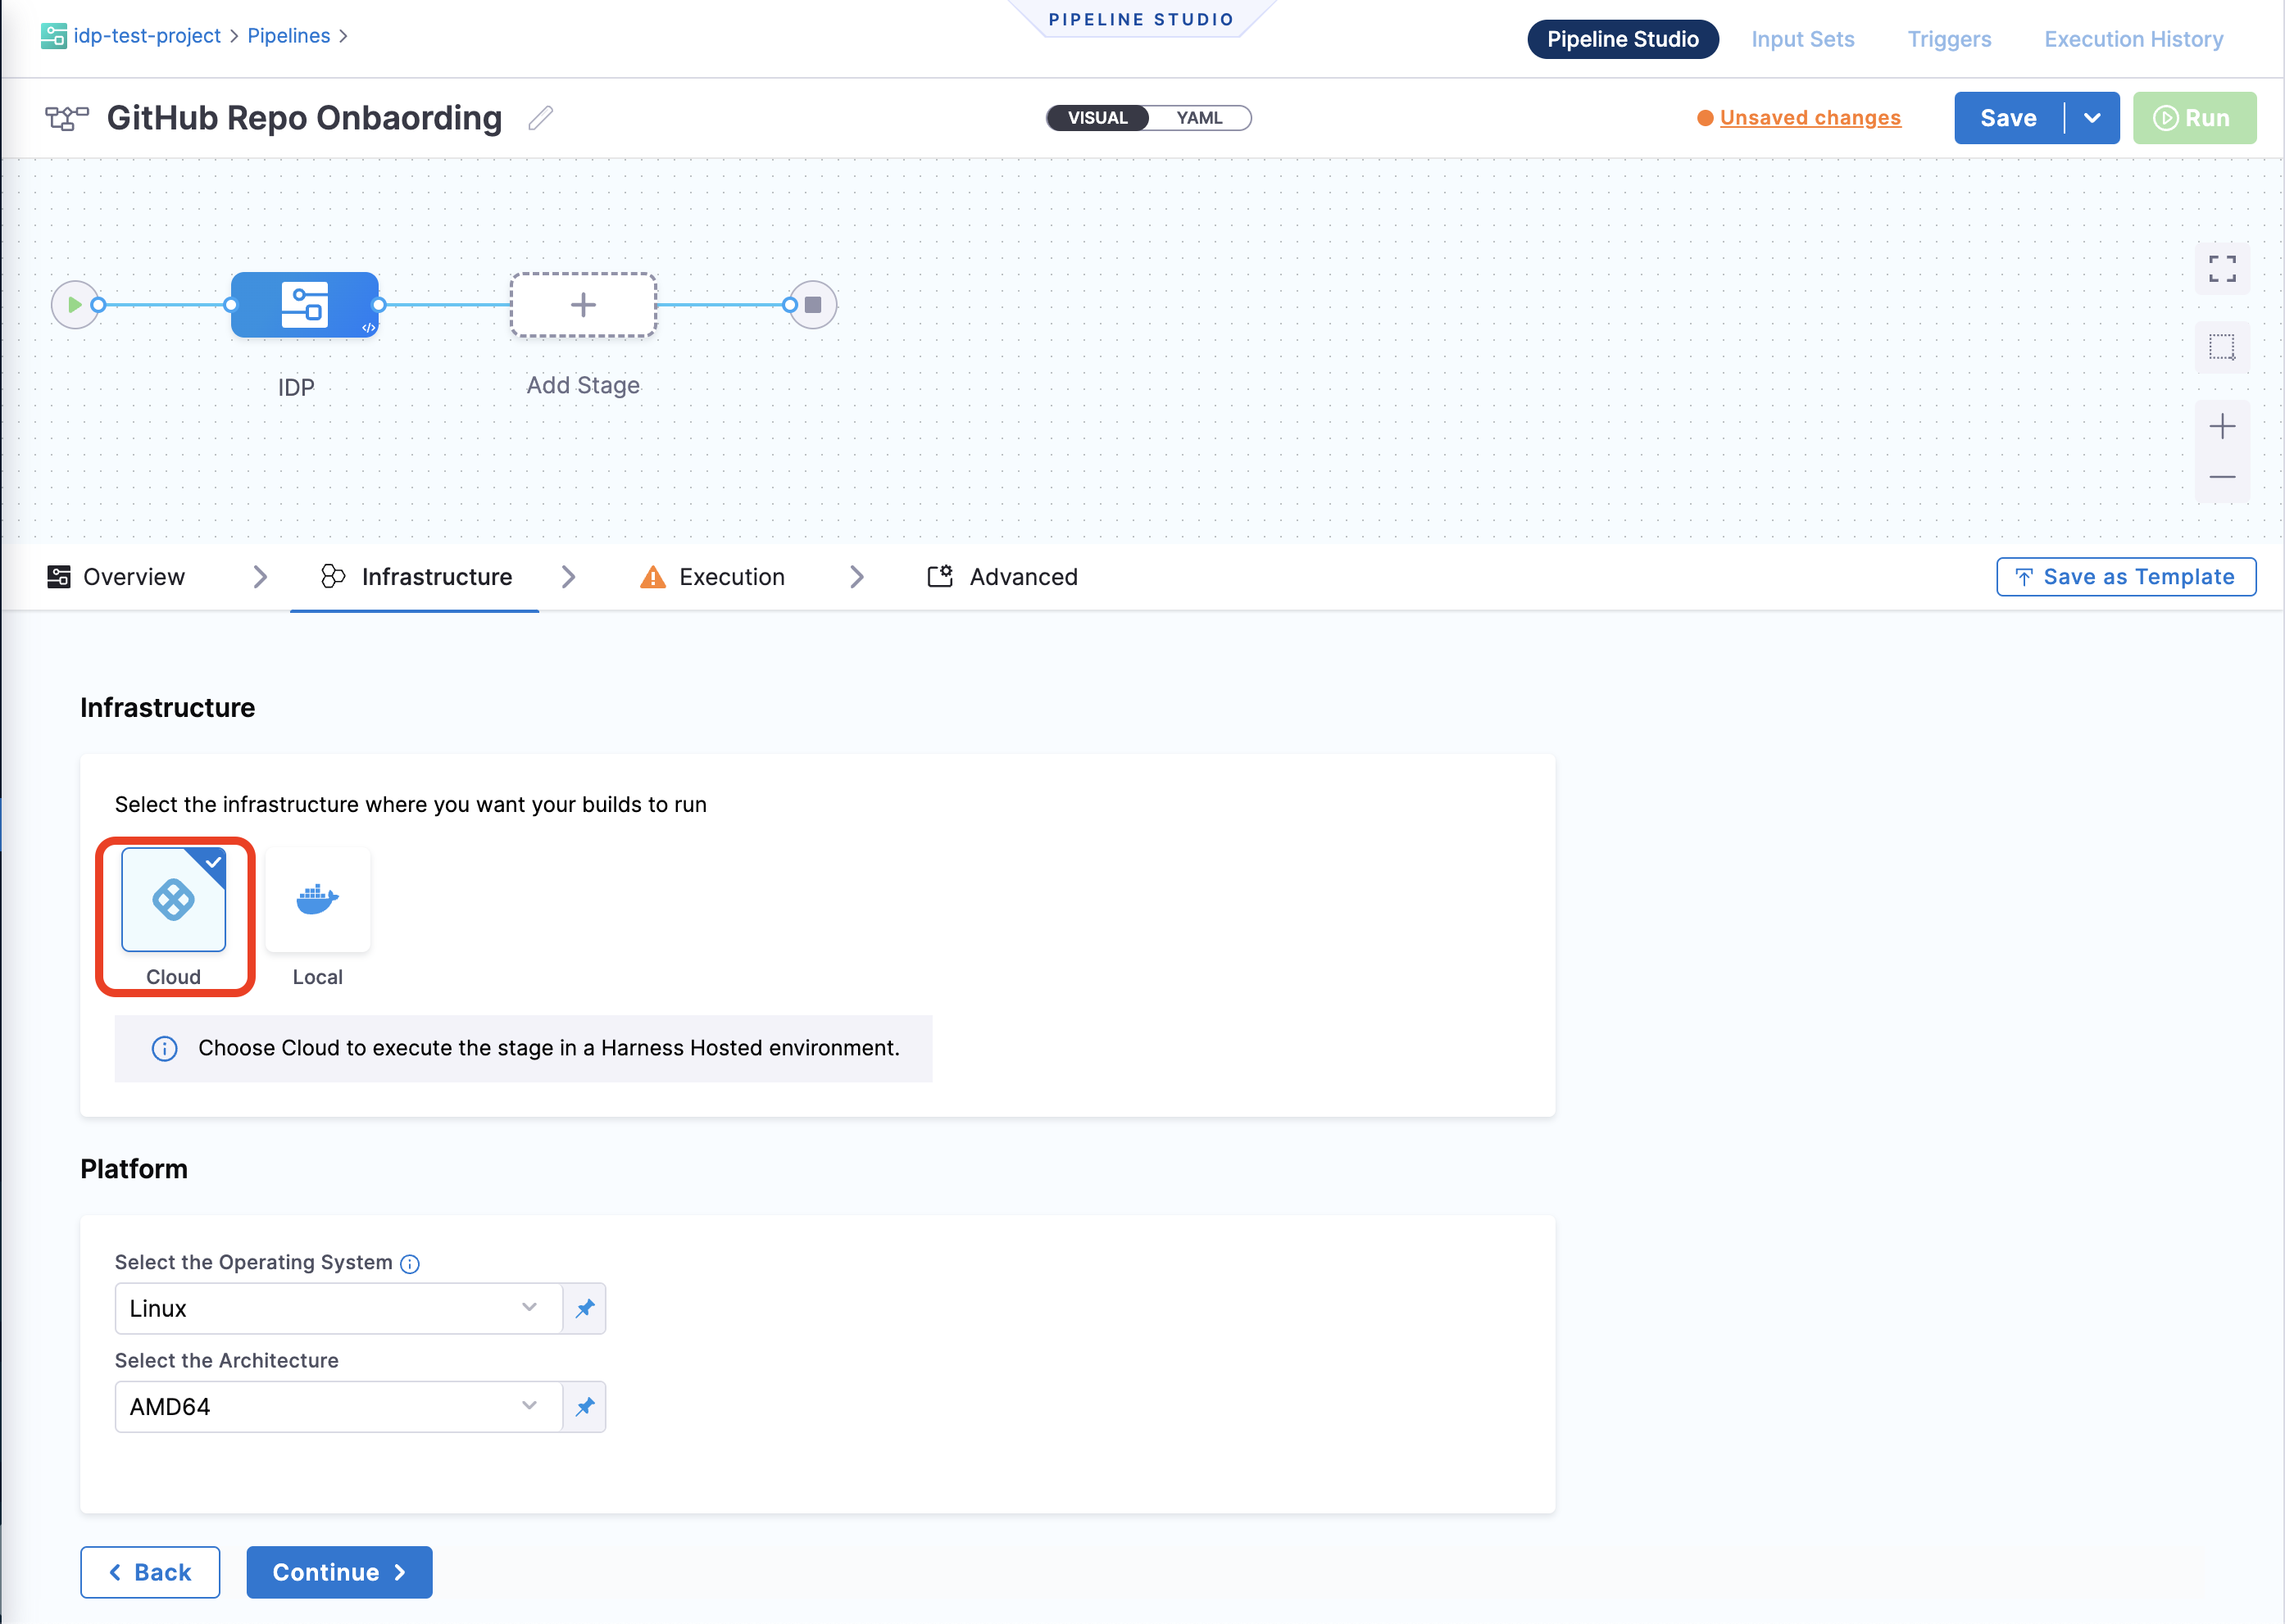
- Select the infrastructure as Harness Cloud.
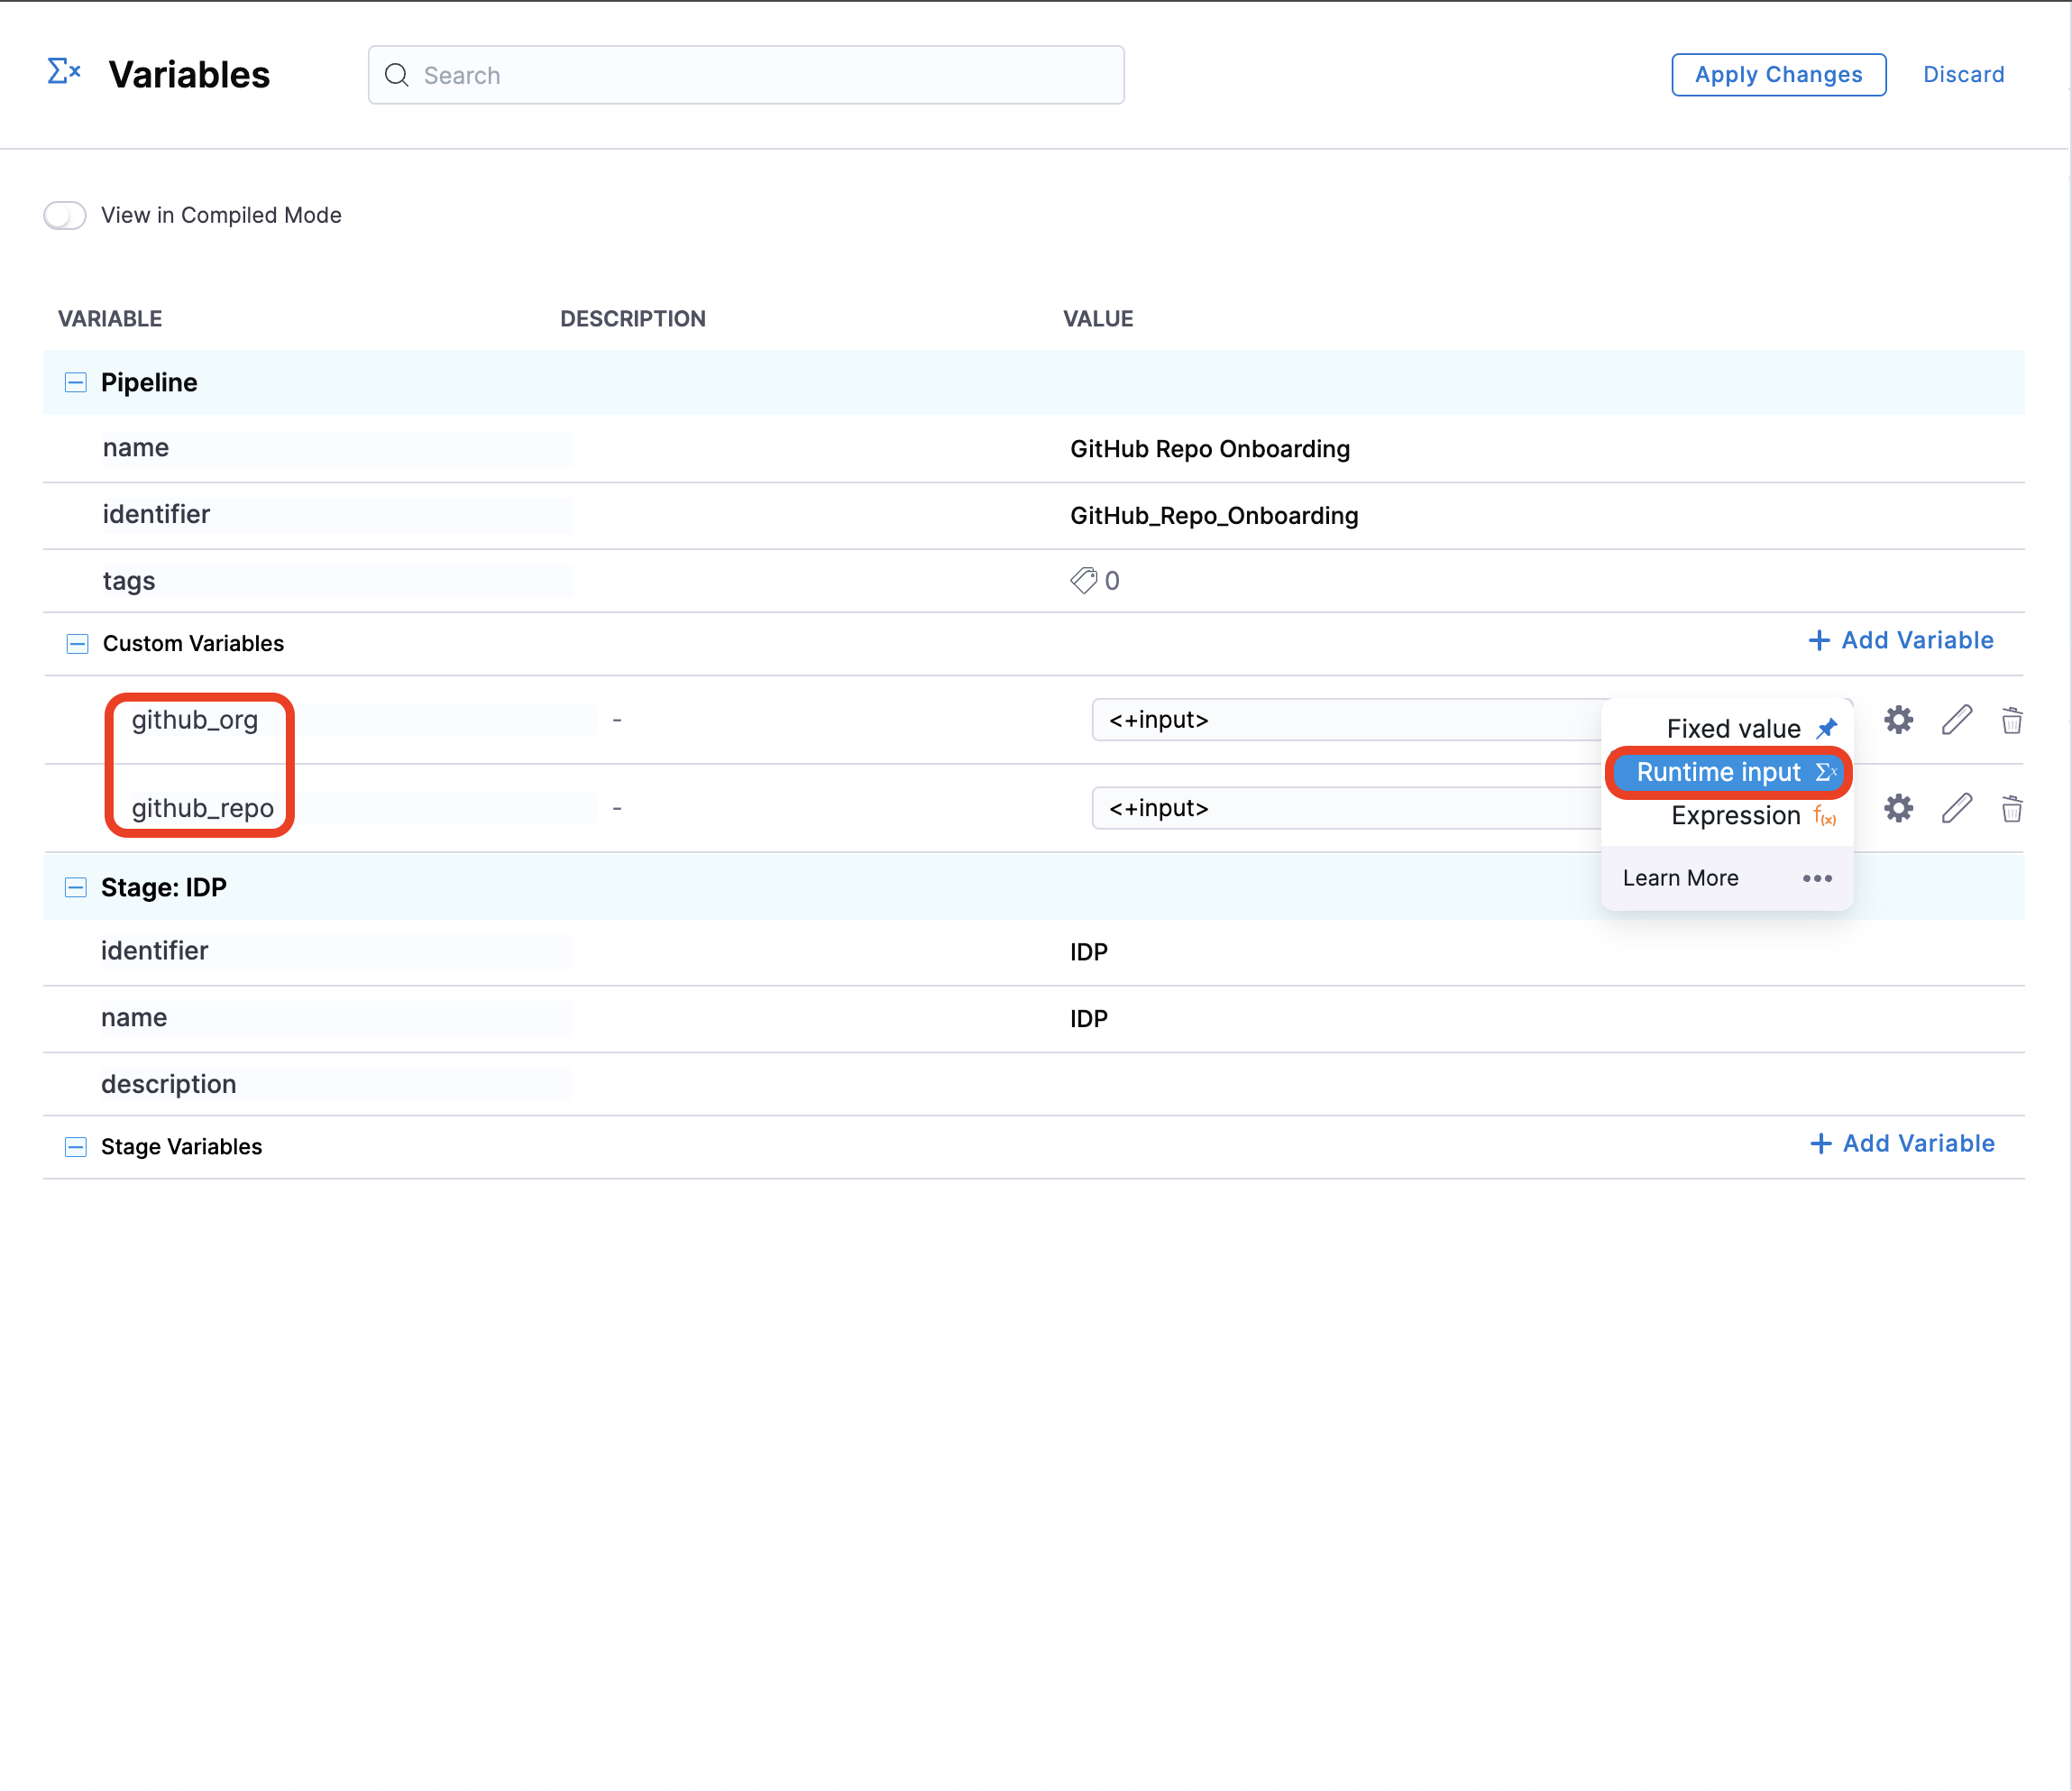
- Now let's create some variables that we will use in further steps. Navigate to the Variables tab in the right corner of the Pipeline Studio, and add the following Custom Variables (stick to the exact naming convention for variables as provided, as these will be used as a reference to input values into the pipeline). The variables are of Type
String, and their Values are set toRuntime Input.github_orggithub_repogithub_username
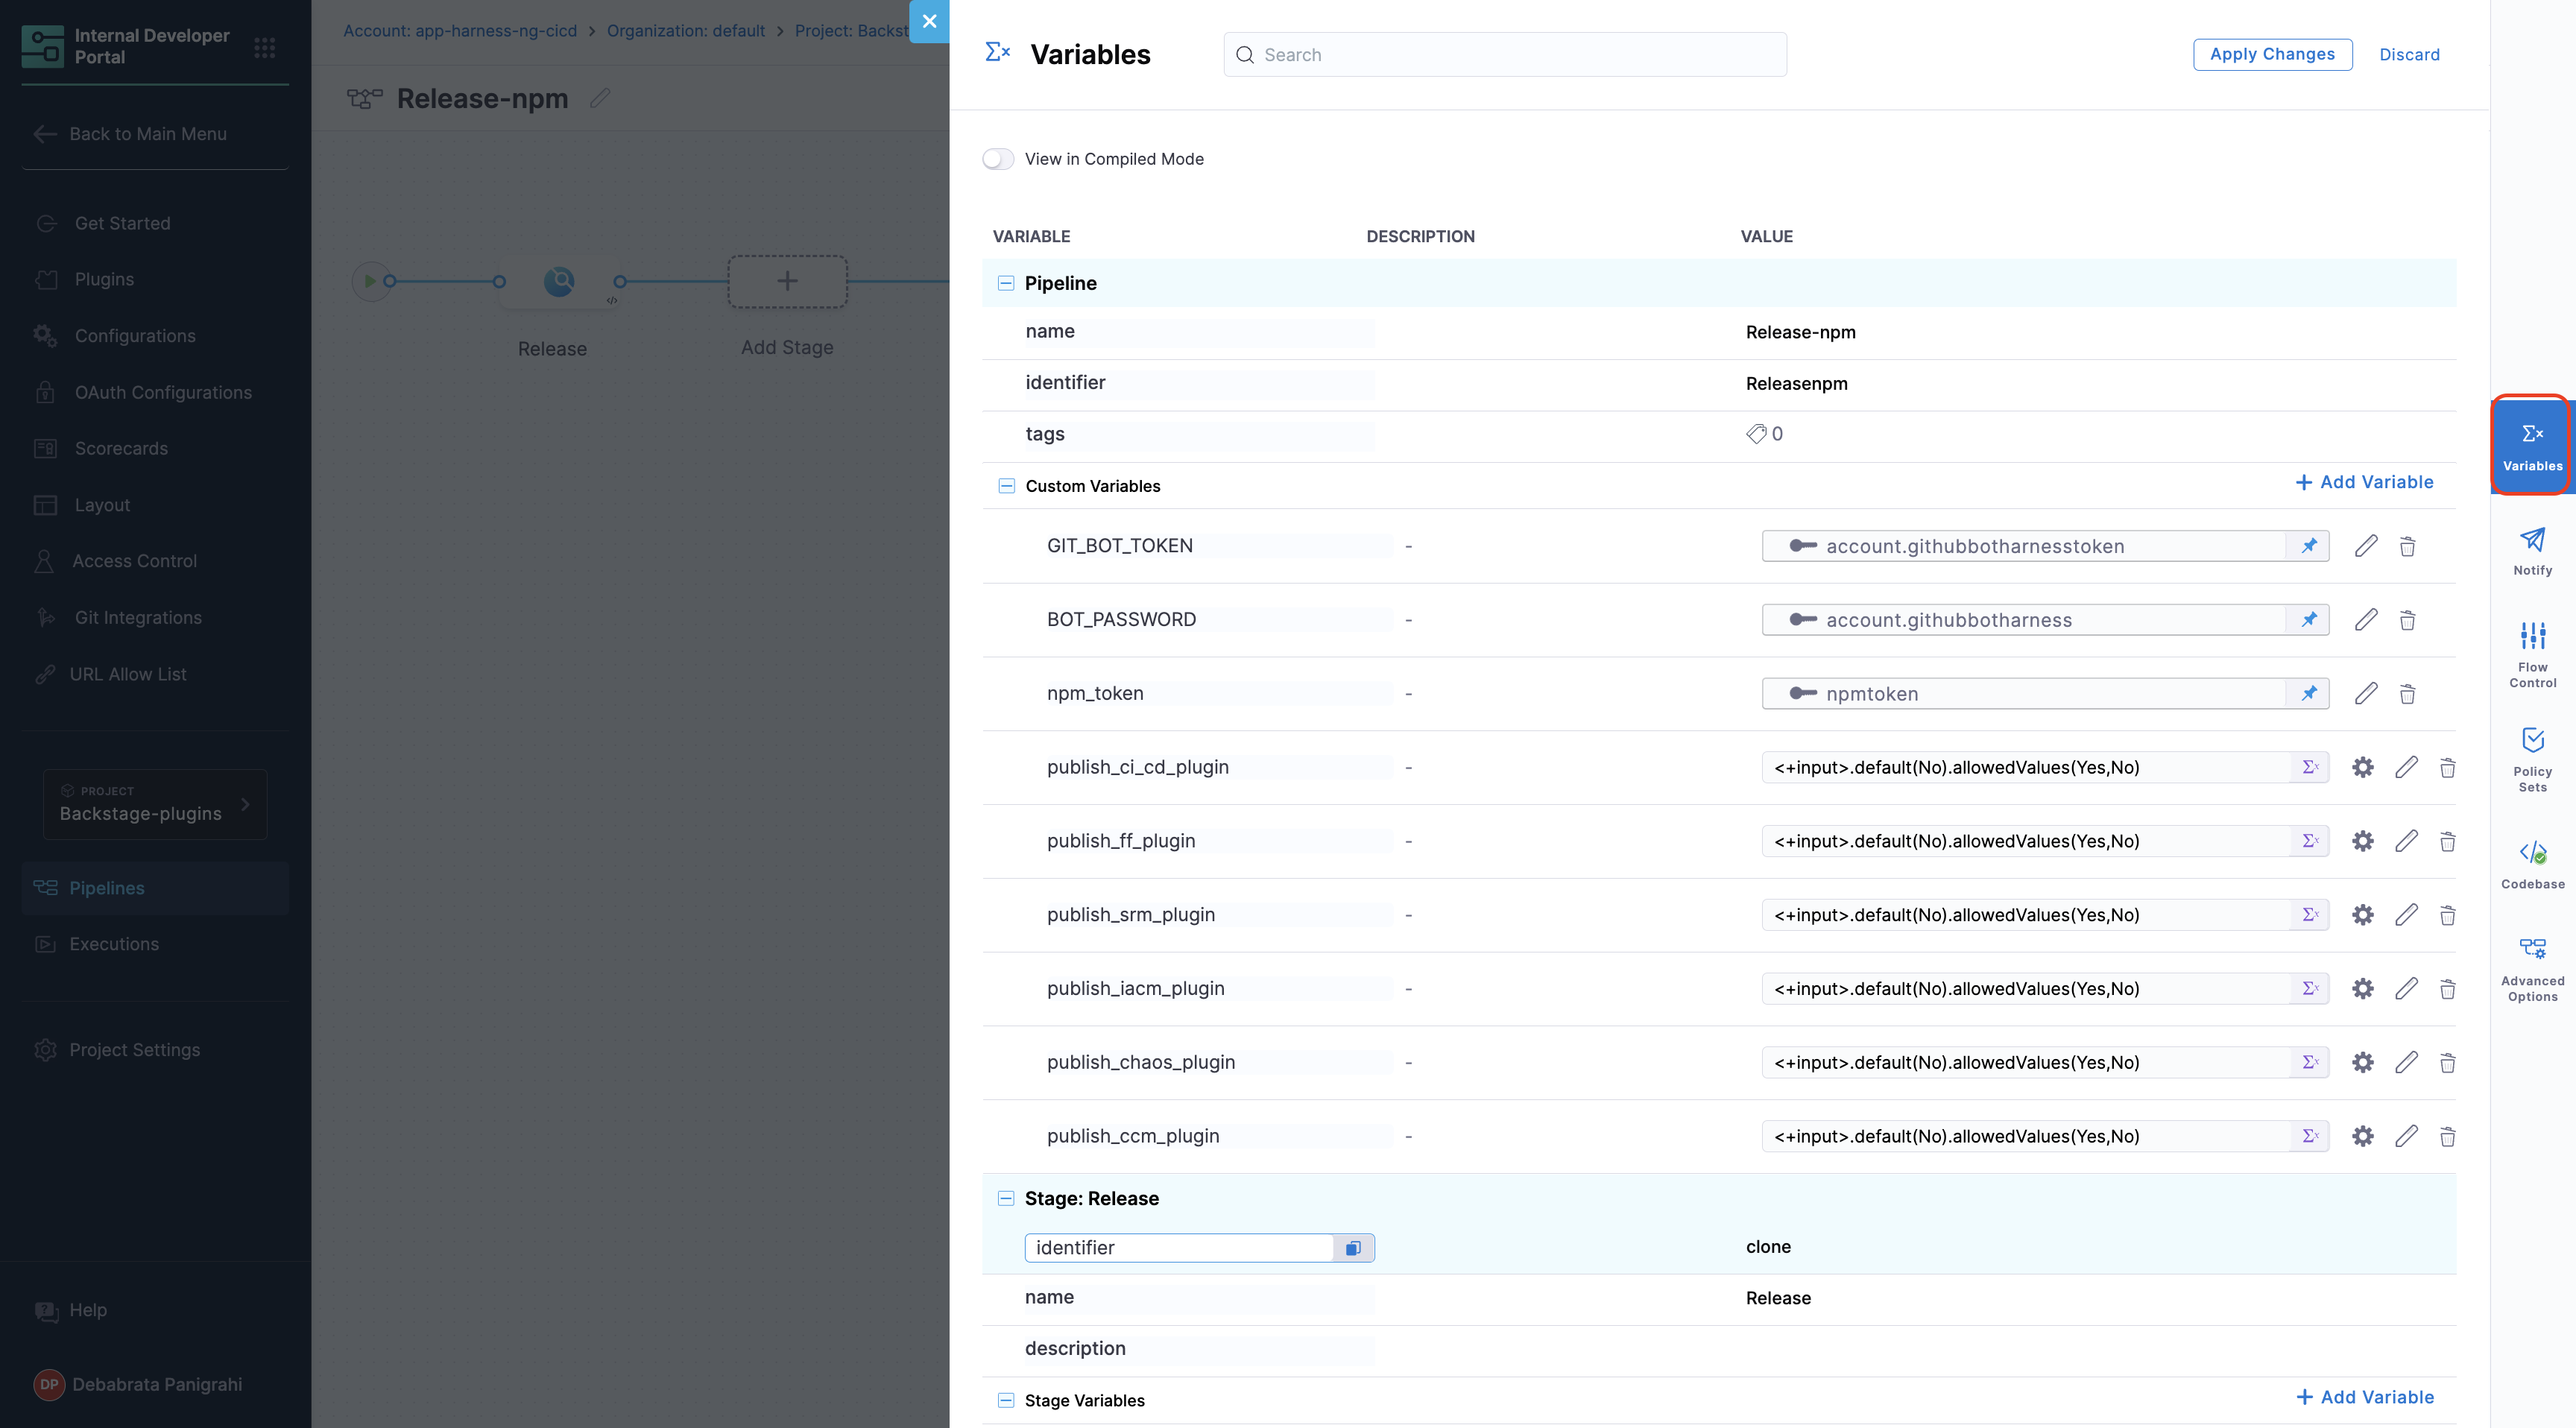
Add another variable github_token as Type Secret and add the GitHub PAT for Values.
Apply the changes
- Now Continue to Execution and Add Step, under Git Repository Setup select Create Repo.
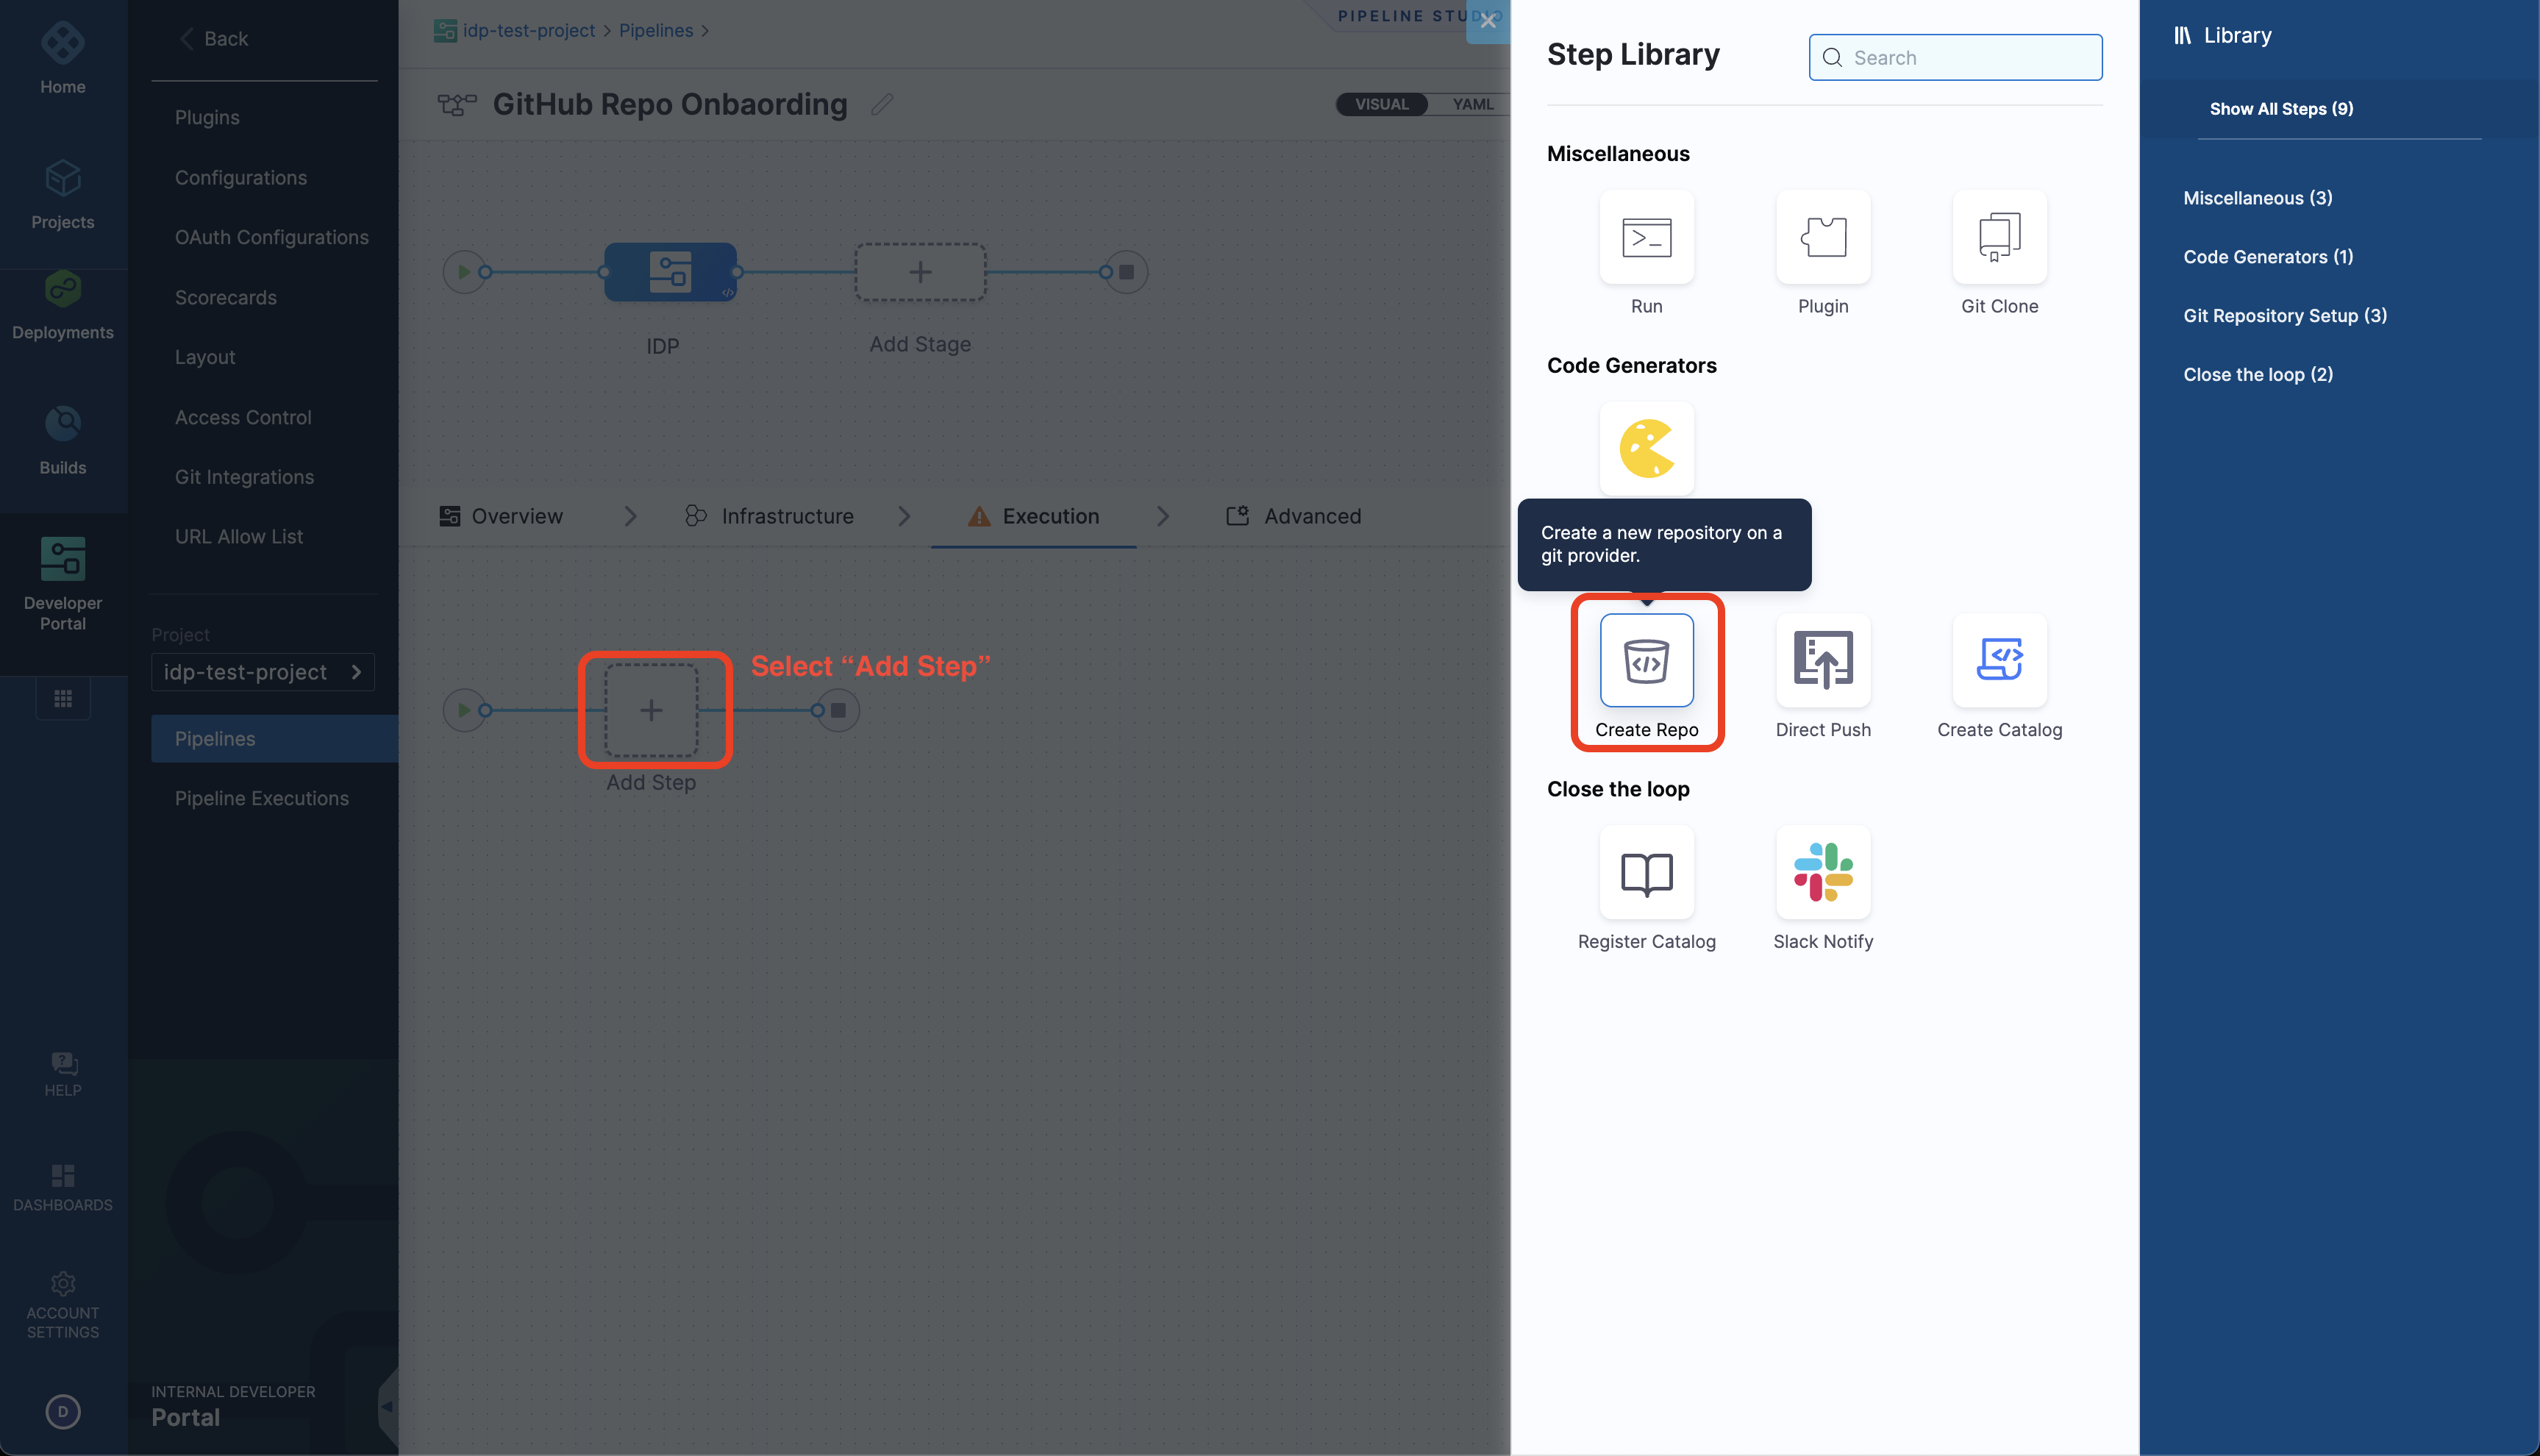
-
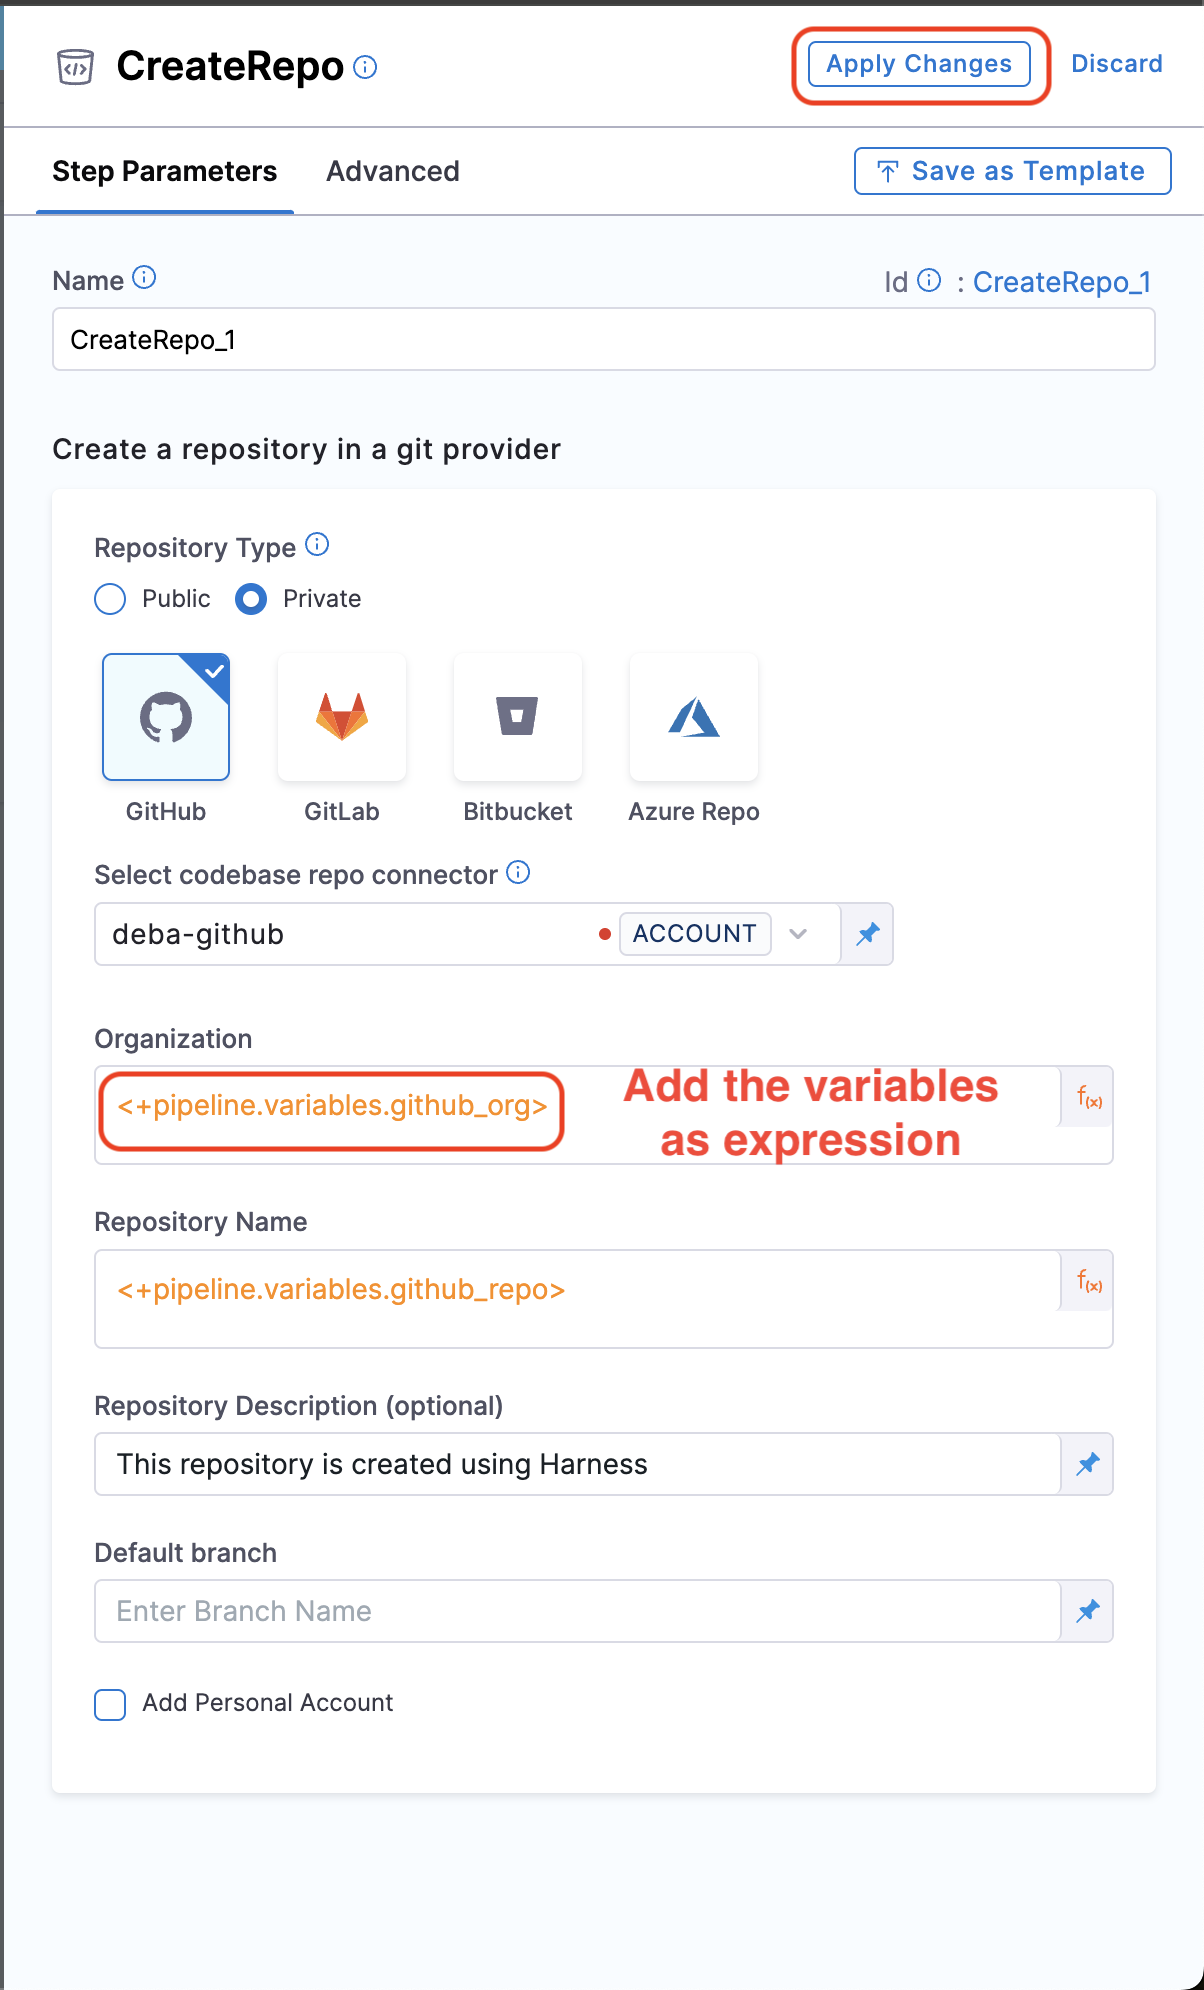
Under Step Parameters, select the Repository Type as Public if the connector you have created use a token generated by your GitHub admin, else you might not have access to the private repo created.
-
Add the Connector you created above.
-
Now under Organization and Repository Name add the variables you created as Expressions (
<+pipeline.variables.github_org>and<+pipeline.variables.github_repo>). -
Add a Repository Description, Apply Changes.
- Now add a Run Step to add your username as an admin to the repo created, with the following curl command, make sure to add a container registry and image, under optional configuration. Container Registry is a Harness Docker Registry Connector used to specify the image on which Harness will run commands, such as images from Docker Hub.
curl -L \
  -X PUT \
  -H "Accept: application/vnd.github+json" \
  -H "Authorization: Bearer <+pipeline.variables.github_token>" \
  -H "X-GitHub-Api-Version: 2022-11-28" \
  https://api.github.com/repos/<+pipeline.variables.github_org>/<+pipeline.variables.github_repo>/collaborators/<+pipeline.variables.github_username> \
  -d '{"permission":"admin"}'
Create Workflow (IDP 1.0)
The Workflow is defined in a YAML file named workflow.yaml. The syntax of the template definition is owned by backstage.io while the workflow runs on a Harness pipeline of your choice.
The following is the example Workflow with Workflows Action to create a new repository.
apiVersion: scaffolder.backstage.io/v1beta3
kind: Template
# some metadata about the template itself
metadata:
  name: Workflows-Quickstart
  title: Create a New GitHub Repository
  description: Creates a new GitHub Repository
spec:
  owner: service.owner
  type: service
  # these are the steps which are rendered in the frontend with the form input
  parameters:
    - title: Fill in the repo details
      required:
        - github_org_name
        - github_repo_name
        - github_username
      properties:
        github_org_name:
          title: GitHub Organization
          type: string
          description: Name the org where you want to add the new repository
        github_repo_name:
          title: Repository Location
          type: string
          description: Name the new repository that you want to create
        github_username:
          title: GitHub Username
          type: string
          description: Add Your GitHub Username
        token:
          title: Harness Token
          type: string
          ui:widget: password
          ui:field: HarnessAuthToken
  # here's the steps that are executed in series in the scaffolder backend
  steps:
    - id: trigger
      name: Onboarding a New GitHub Repository
      action: trigger:harness-custom-pipeline
      input:
        url: "URL_of_the_Harness_Pipeline_Created_Above"
        inputset:
          github_org: ${{ parameters.github_org_name }}
          github_repo: ${{ parameters.github_repo_name }}
          github_username: ${{parameters.github_username}}
        apikey: ${{ parameters.token }}
    # The final step is to register our new component in the catalog.

  output:
    links:
      - title: Pipeline Details
        url: ${{ steps.trigger.output.PipelineUrl }}
In the above Workflow we have used the Harness Trigger Workflow Action, which takes the exact variable name github_org and github_repo you created for your pipeline as input and a token as apikey
The token property used to fetch the Harness Auth Token is hidden on the Review Step using ui:widget: password. However, for this to function correctly in a multi-page workflow, the token property must be included under the first page.
parameters:
  - title: <PAGE-1 TITLE>
    properties:
      property-1:
        title: title-1
        type: string
      property-2:
        title: title-2
    token:
      title: Harness Token
      type: string
      ui:widget: password
      ui:field: HarnessAuthToken
  - title: <PAGE-2 TITLE>
    properties:
      property-1:
        title: title-1
        type: string
      property-2:
        title: title-2
  - title: <PAGE-n TITLE>
- Copy the above Workflow file in your git provider, replace the value of
input.urlunderstepswith the Harness pipeline URL you created and save it asworkflow.yaml.
Register Workflow in IDP (IDP 1.0)
- In the left navigation, select Workflows, and then select Register New Workflow.

-
Enter the URL to your new
workflow.yaml.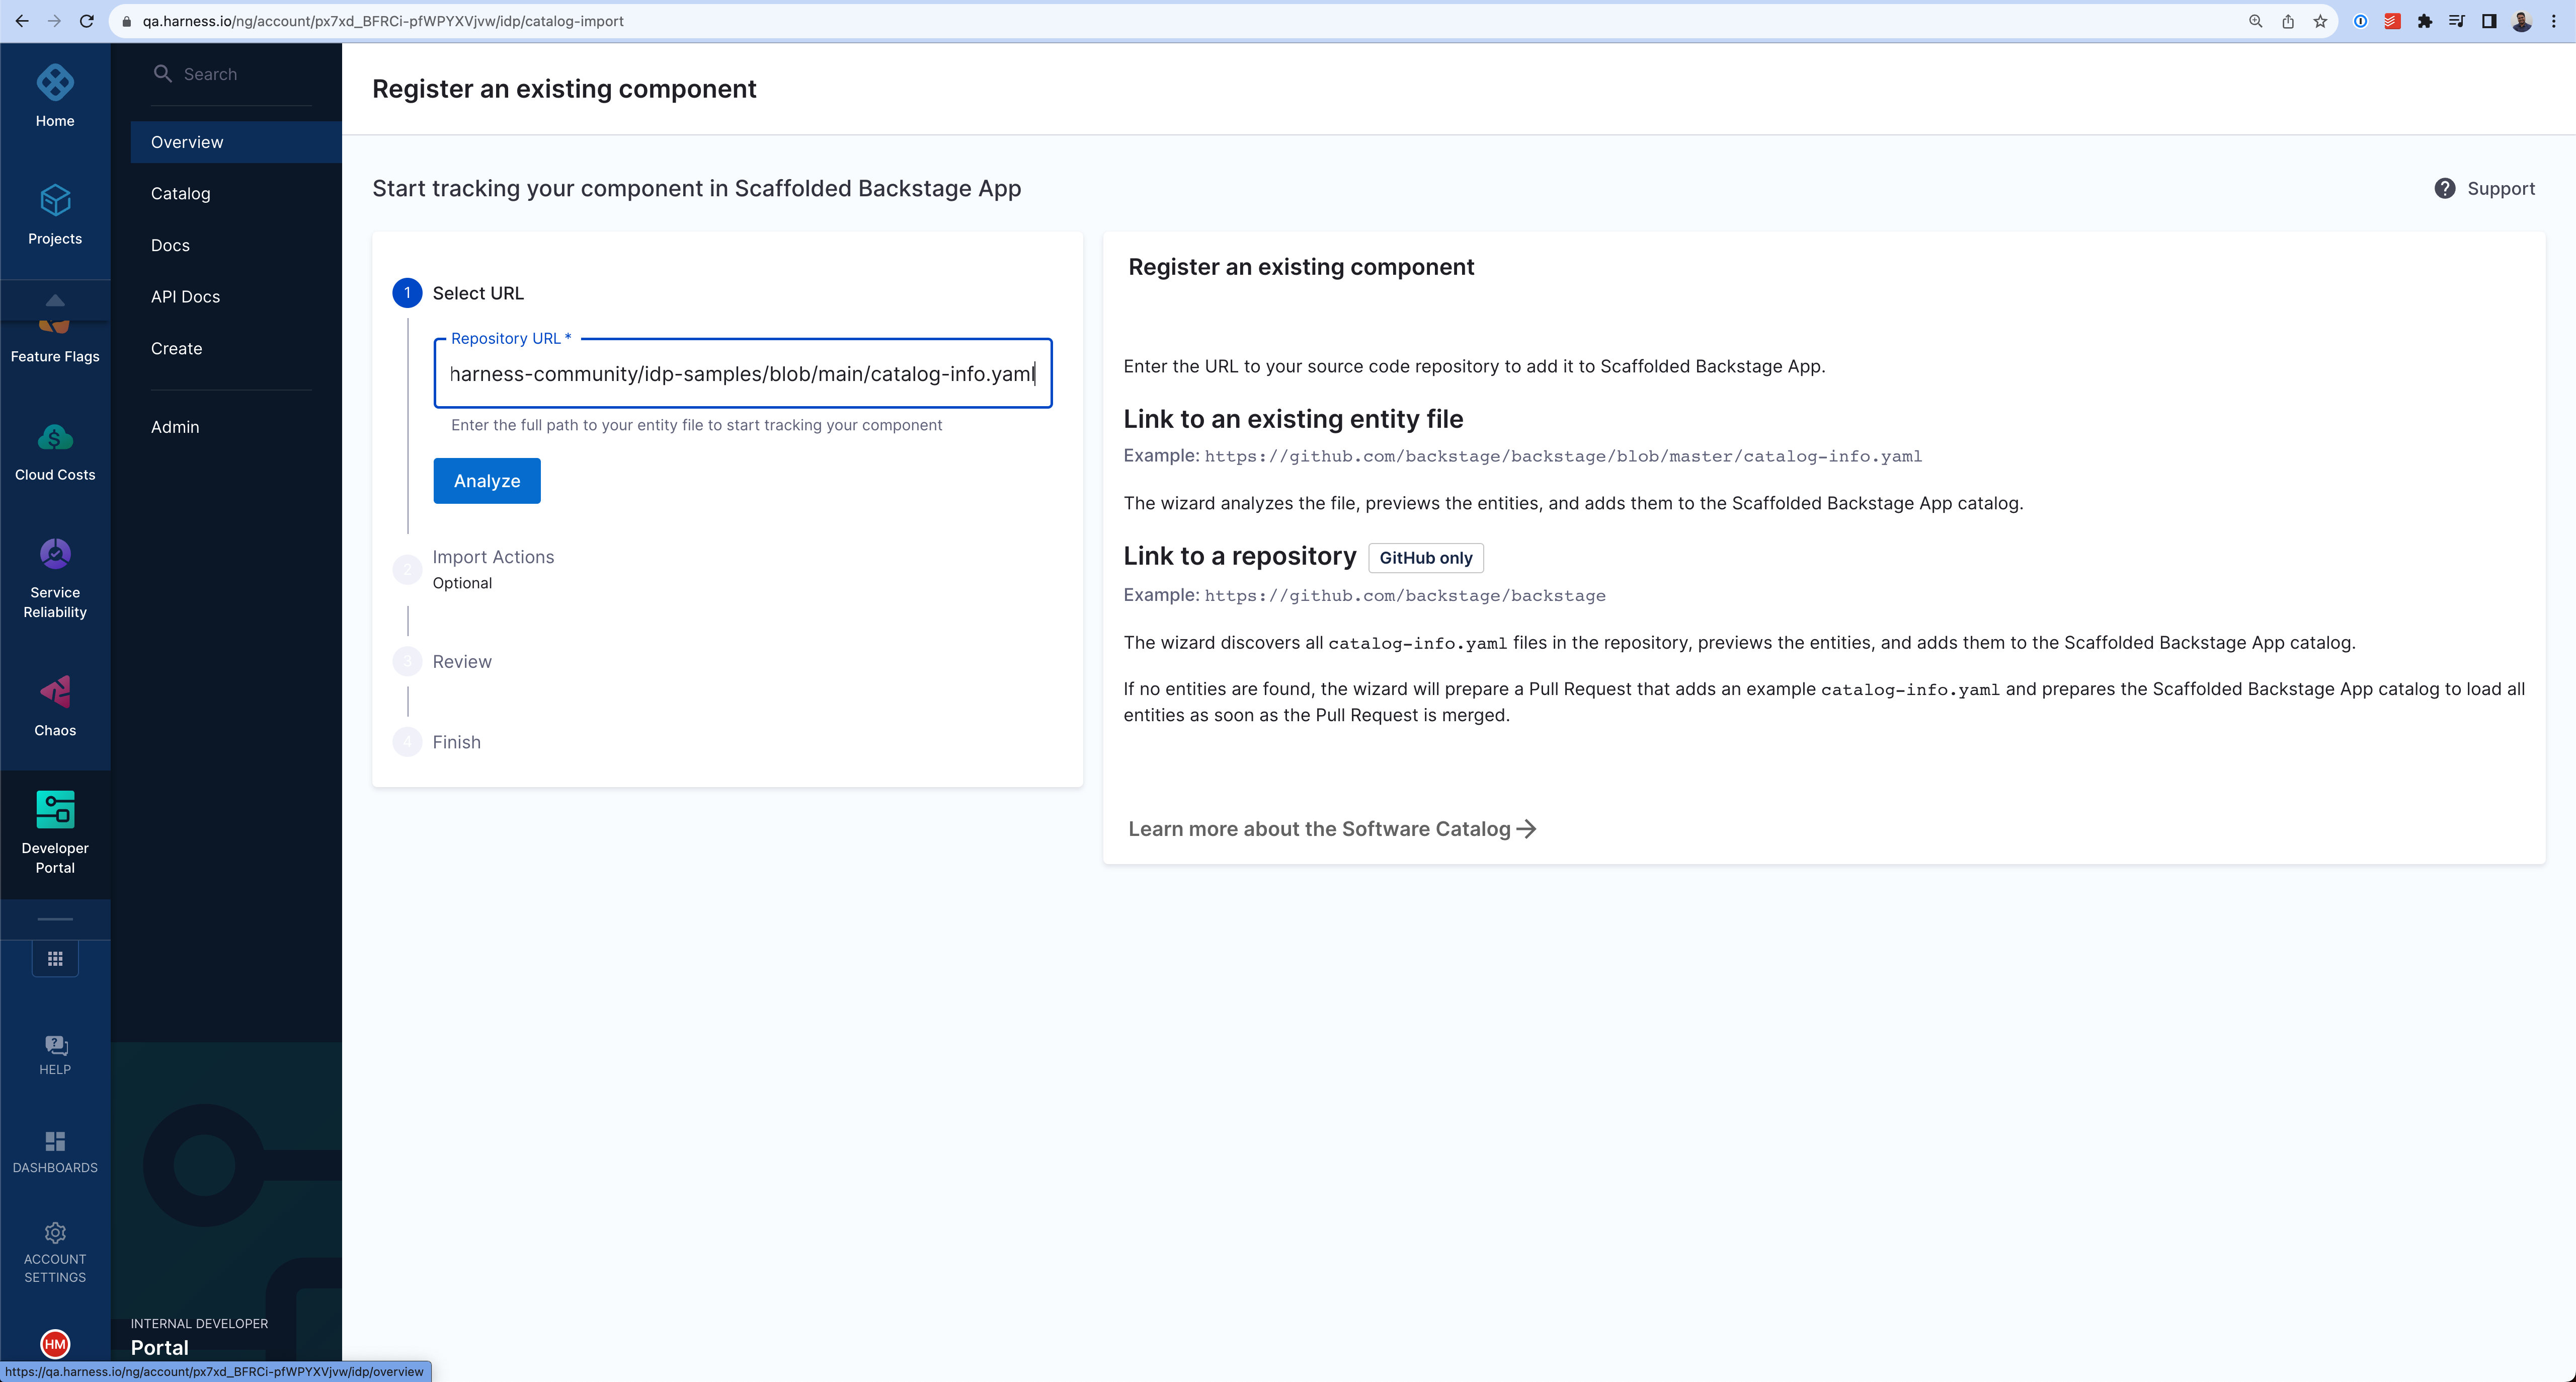
-
Select Import.
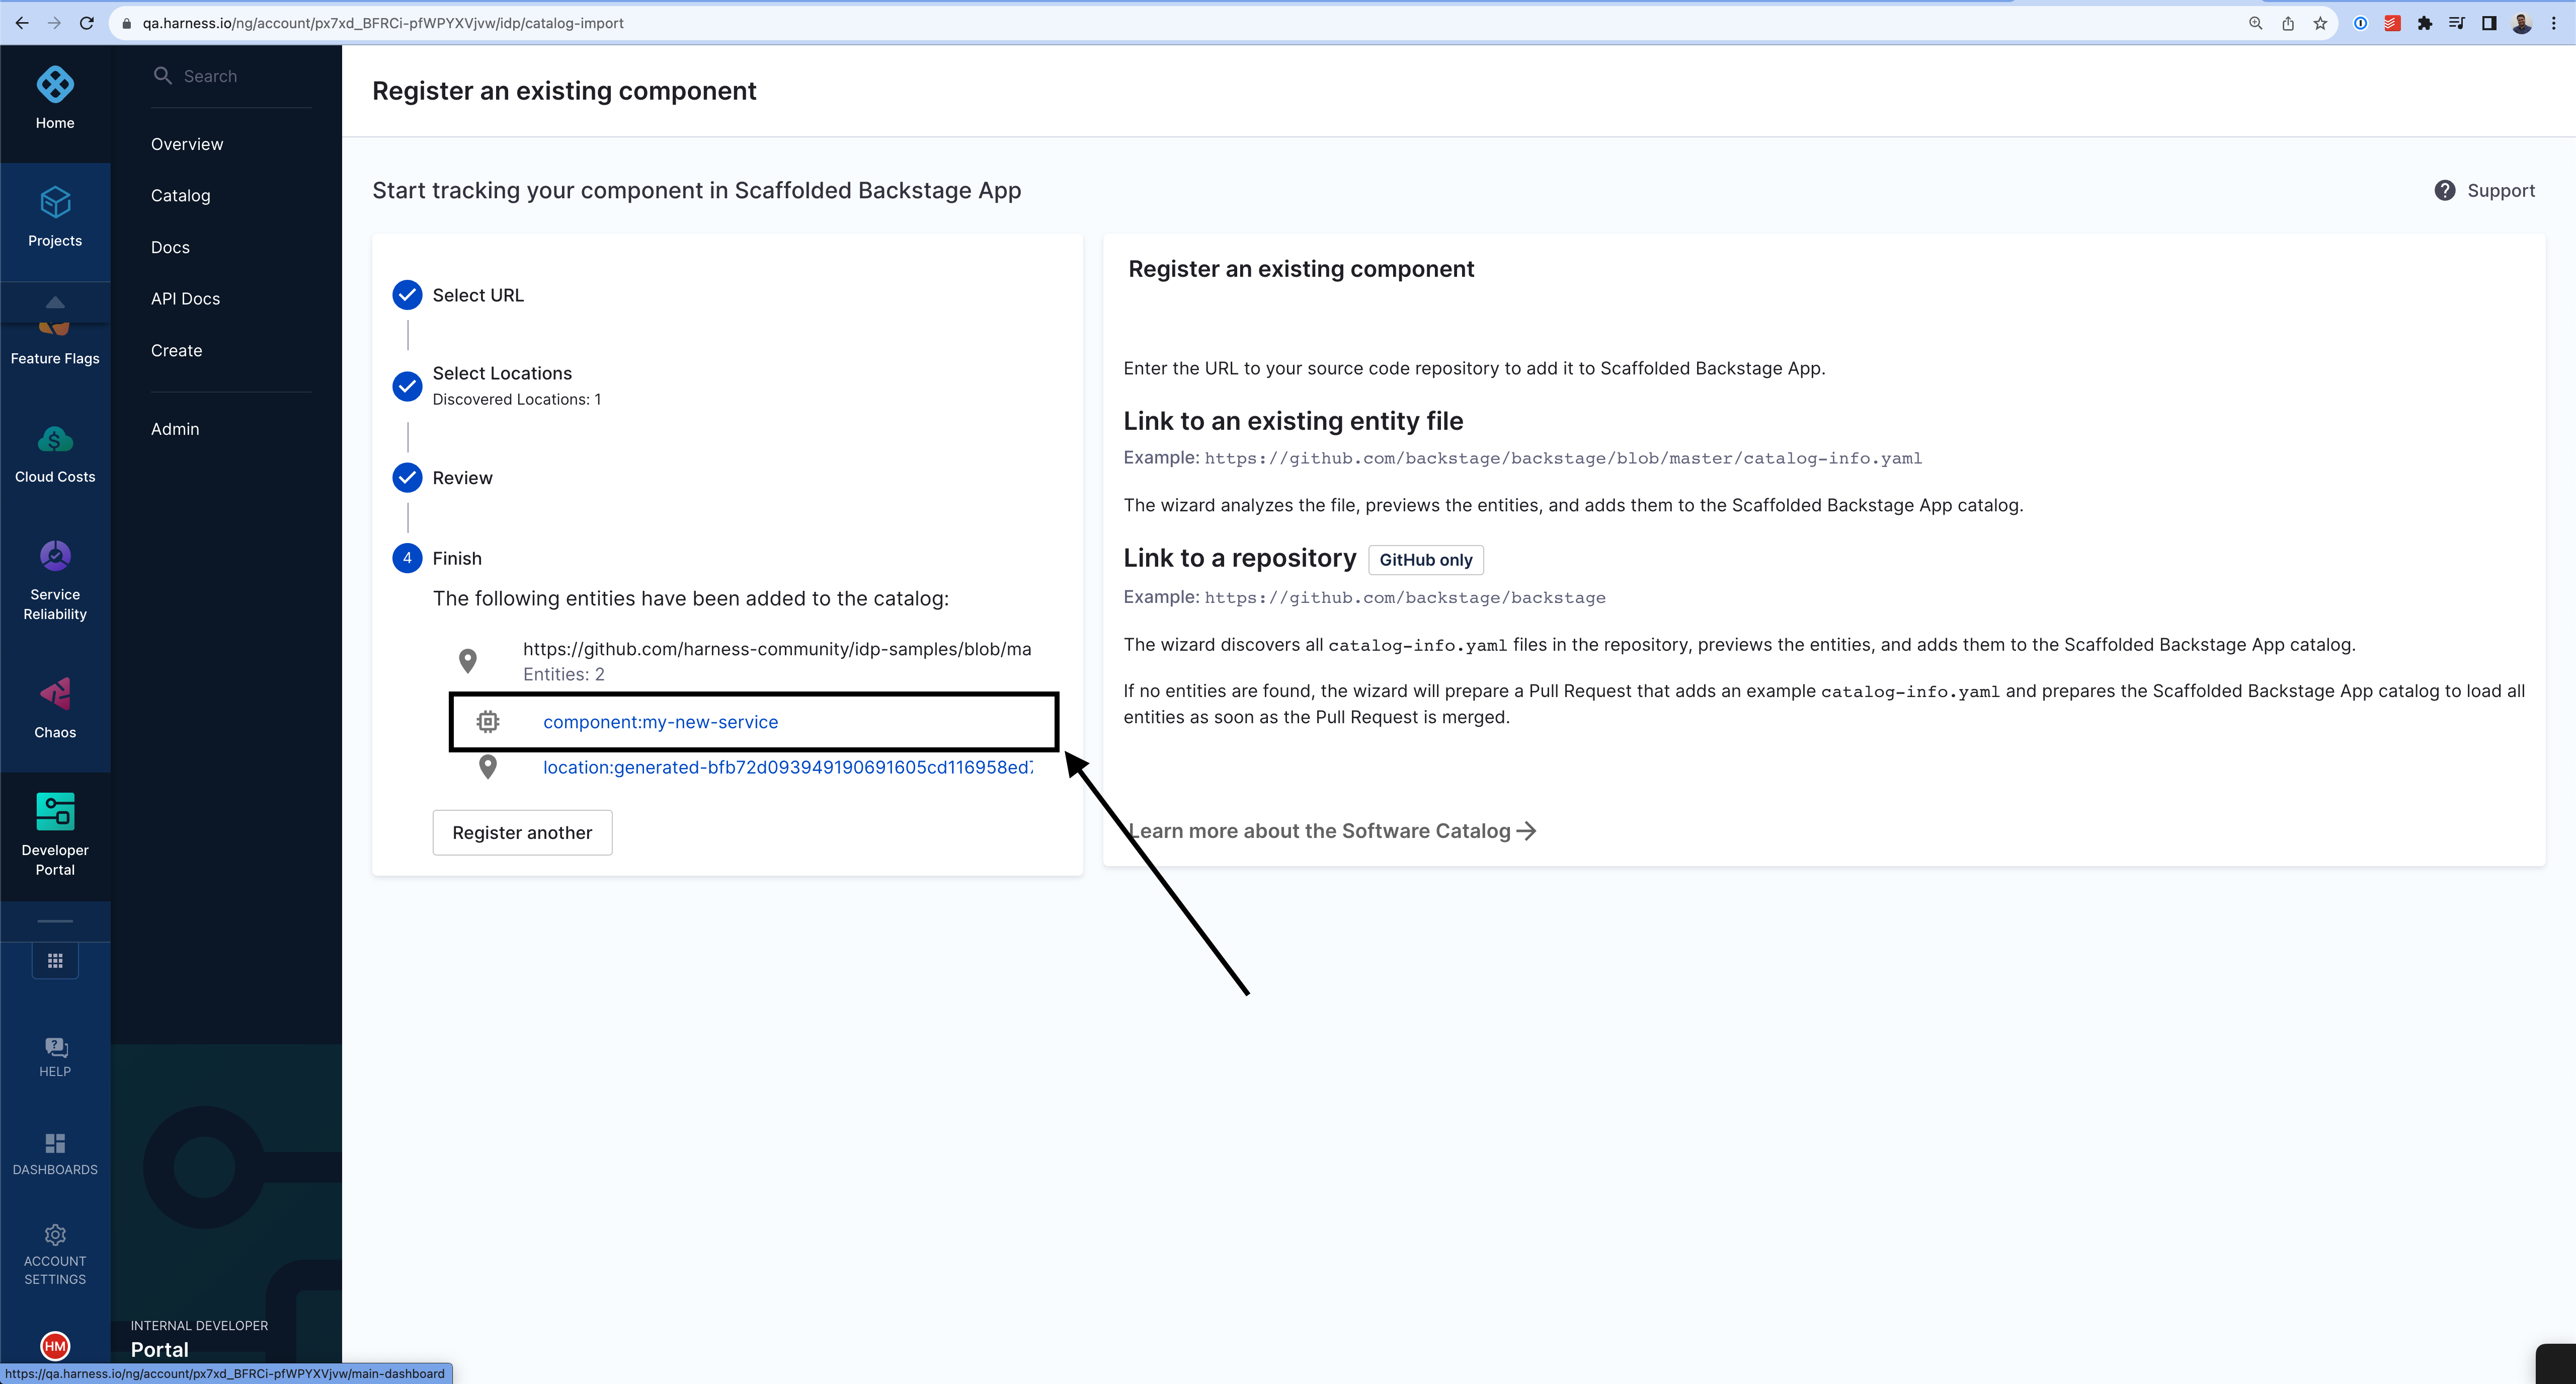
- Now click on the Workflow name
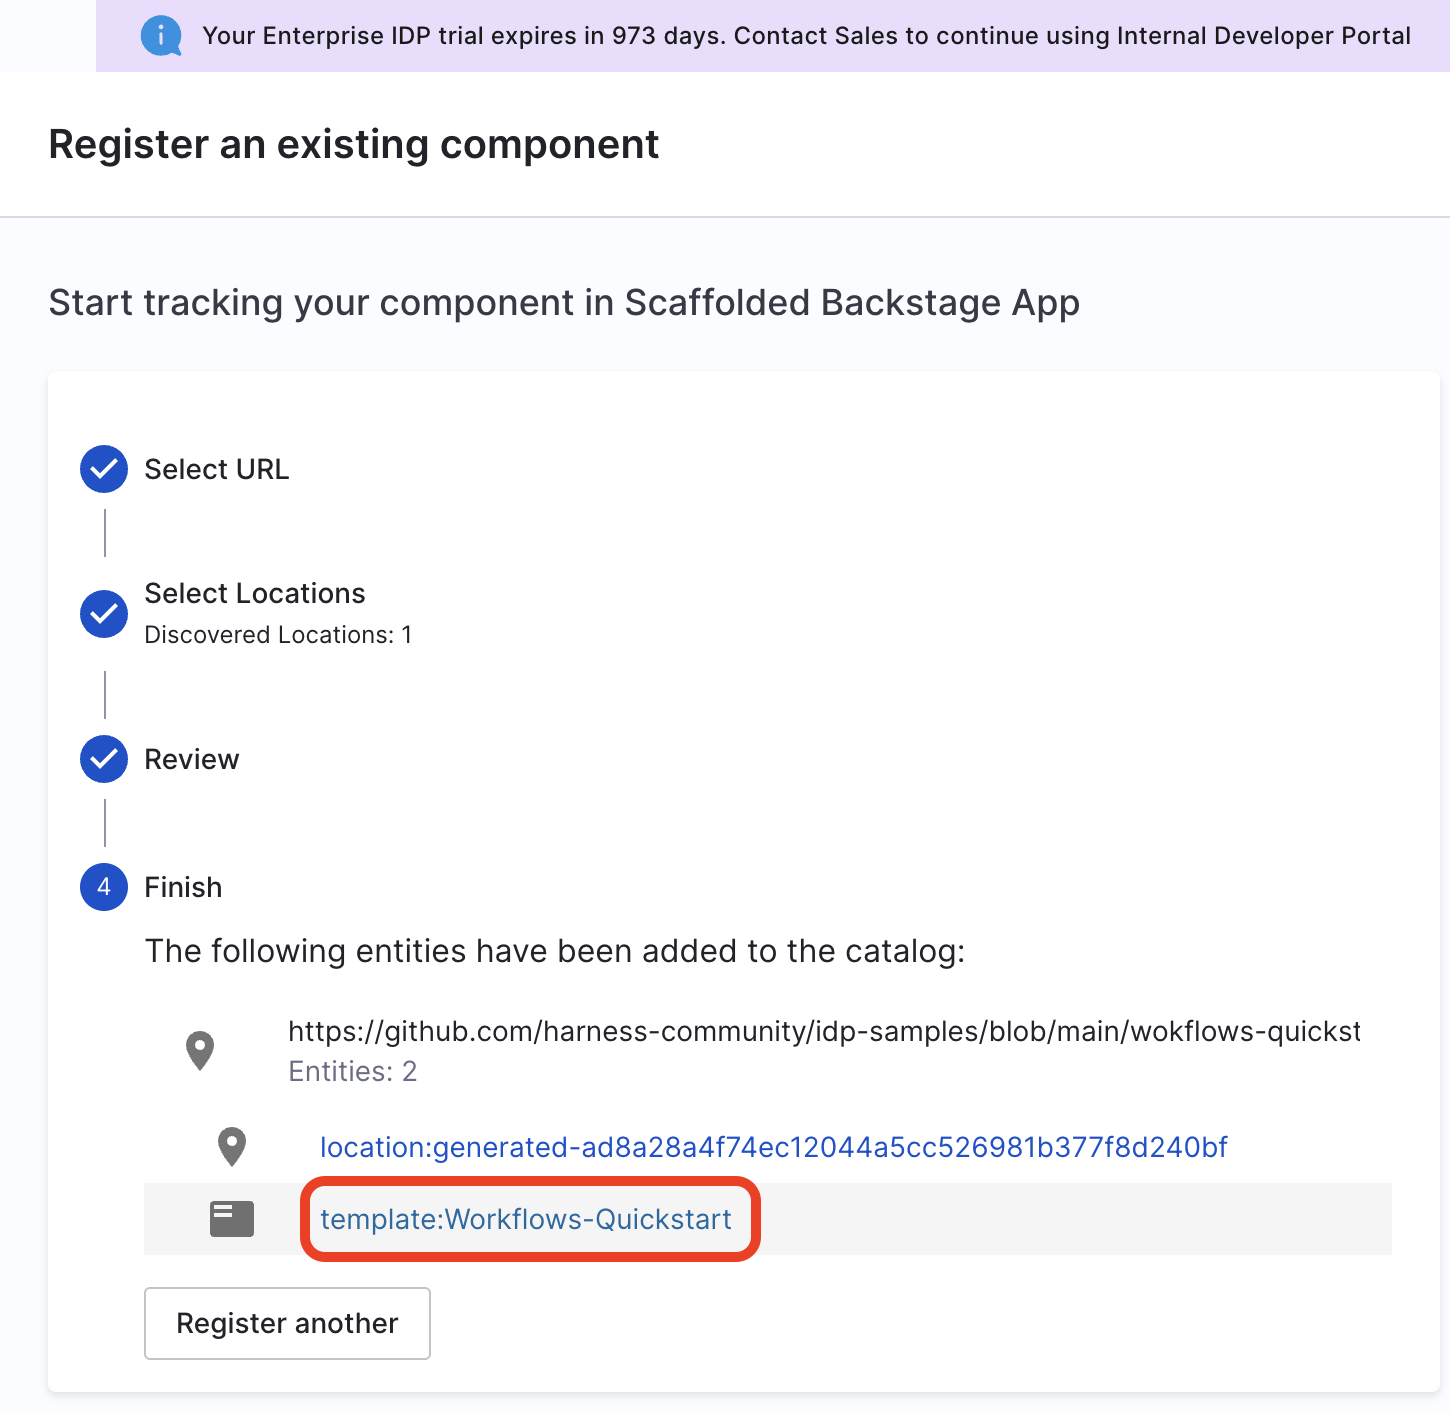
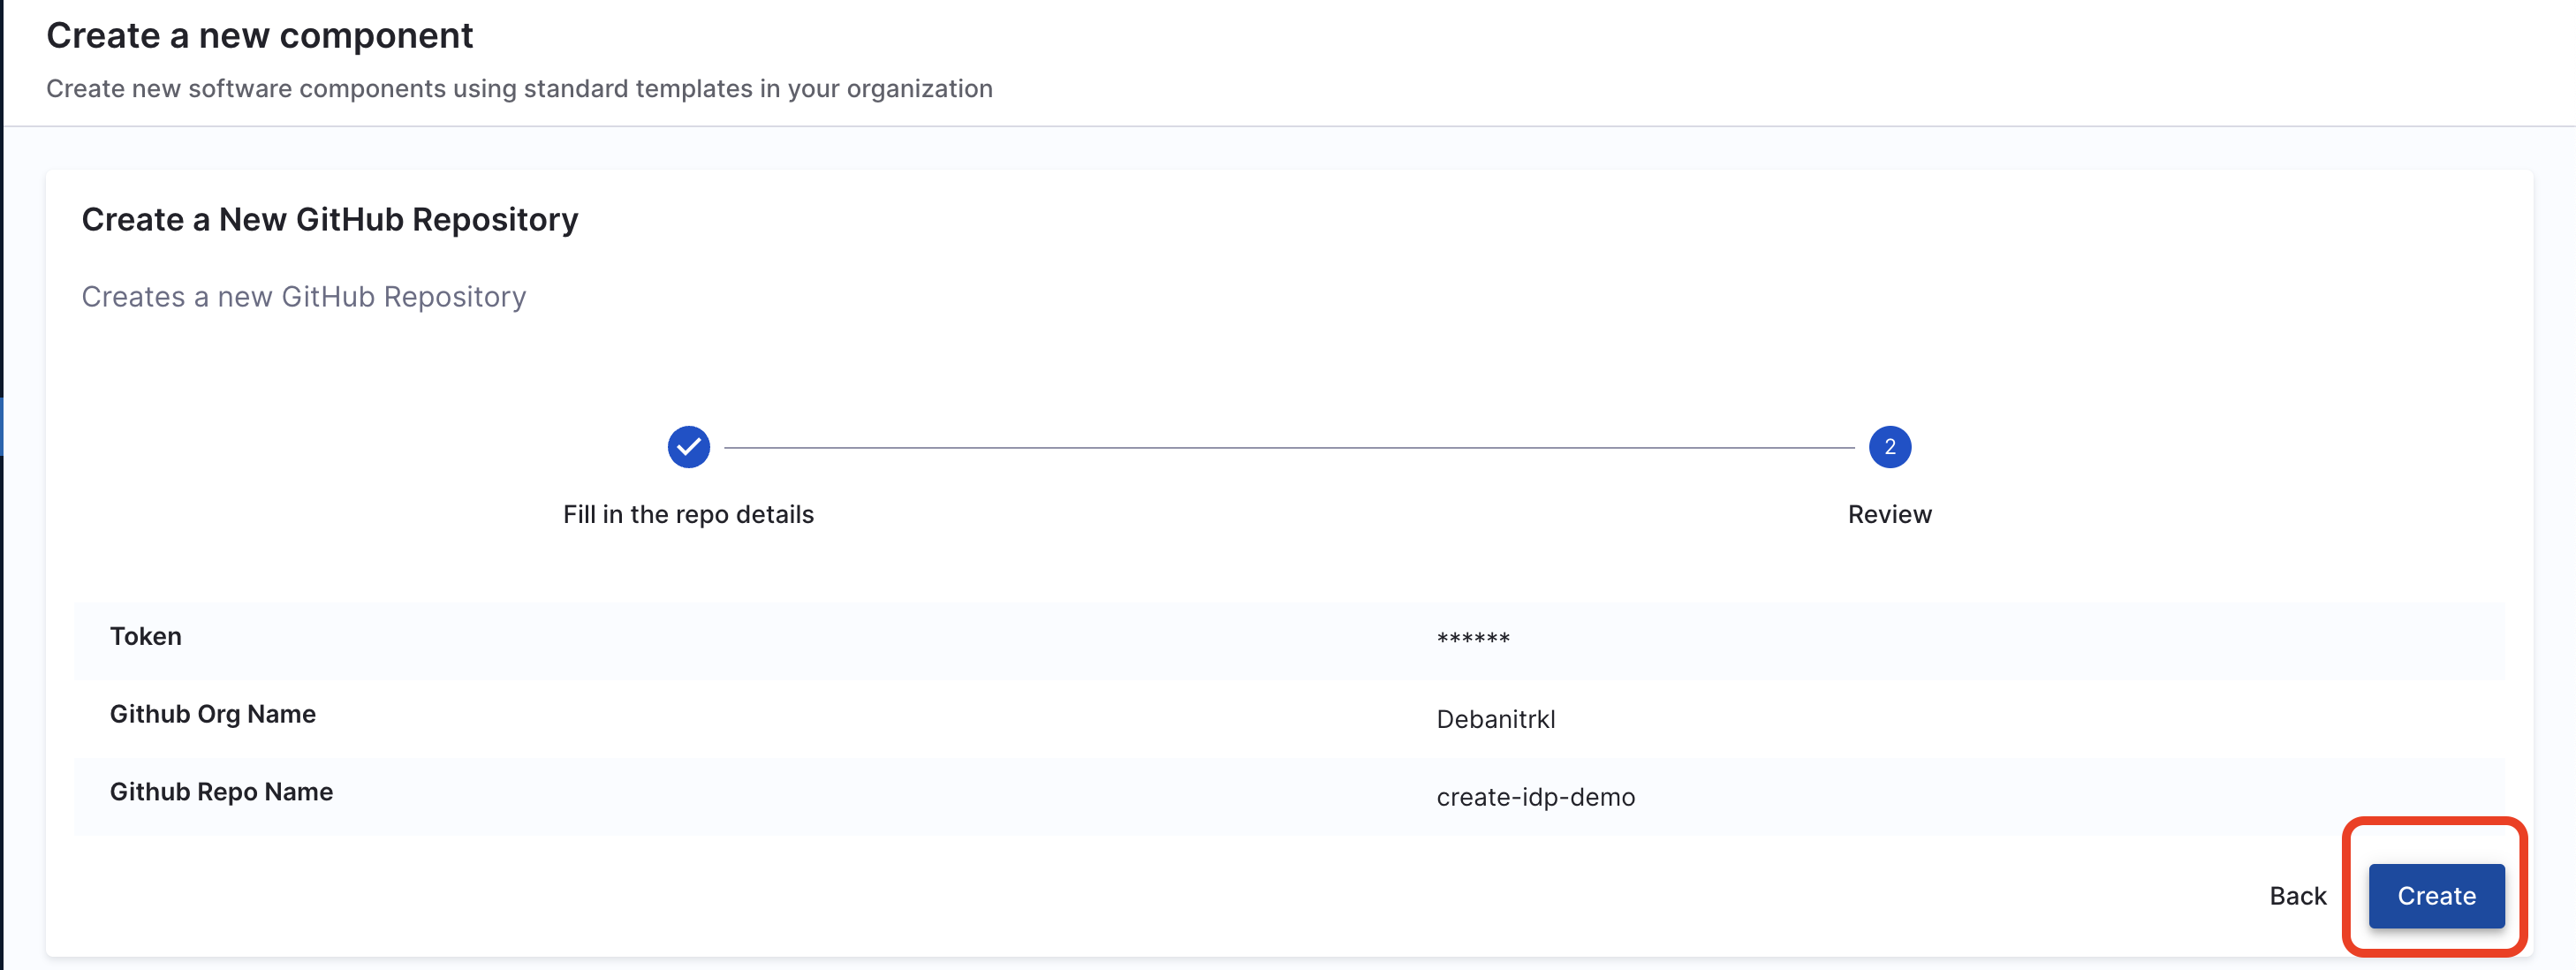
Use Workflows to Create a Repo (IDP 1.0)
- Once you're on the entity page for Workflow, Launch the Workflow.
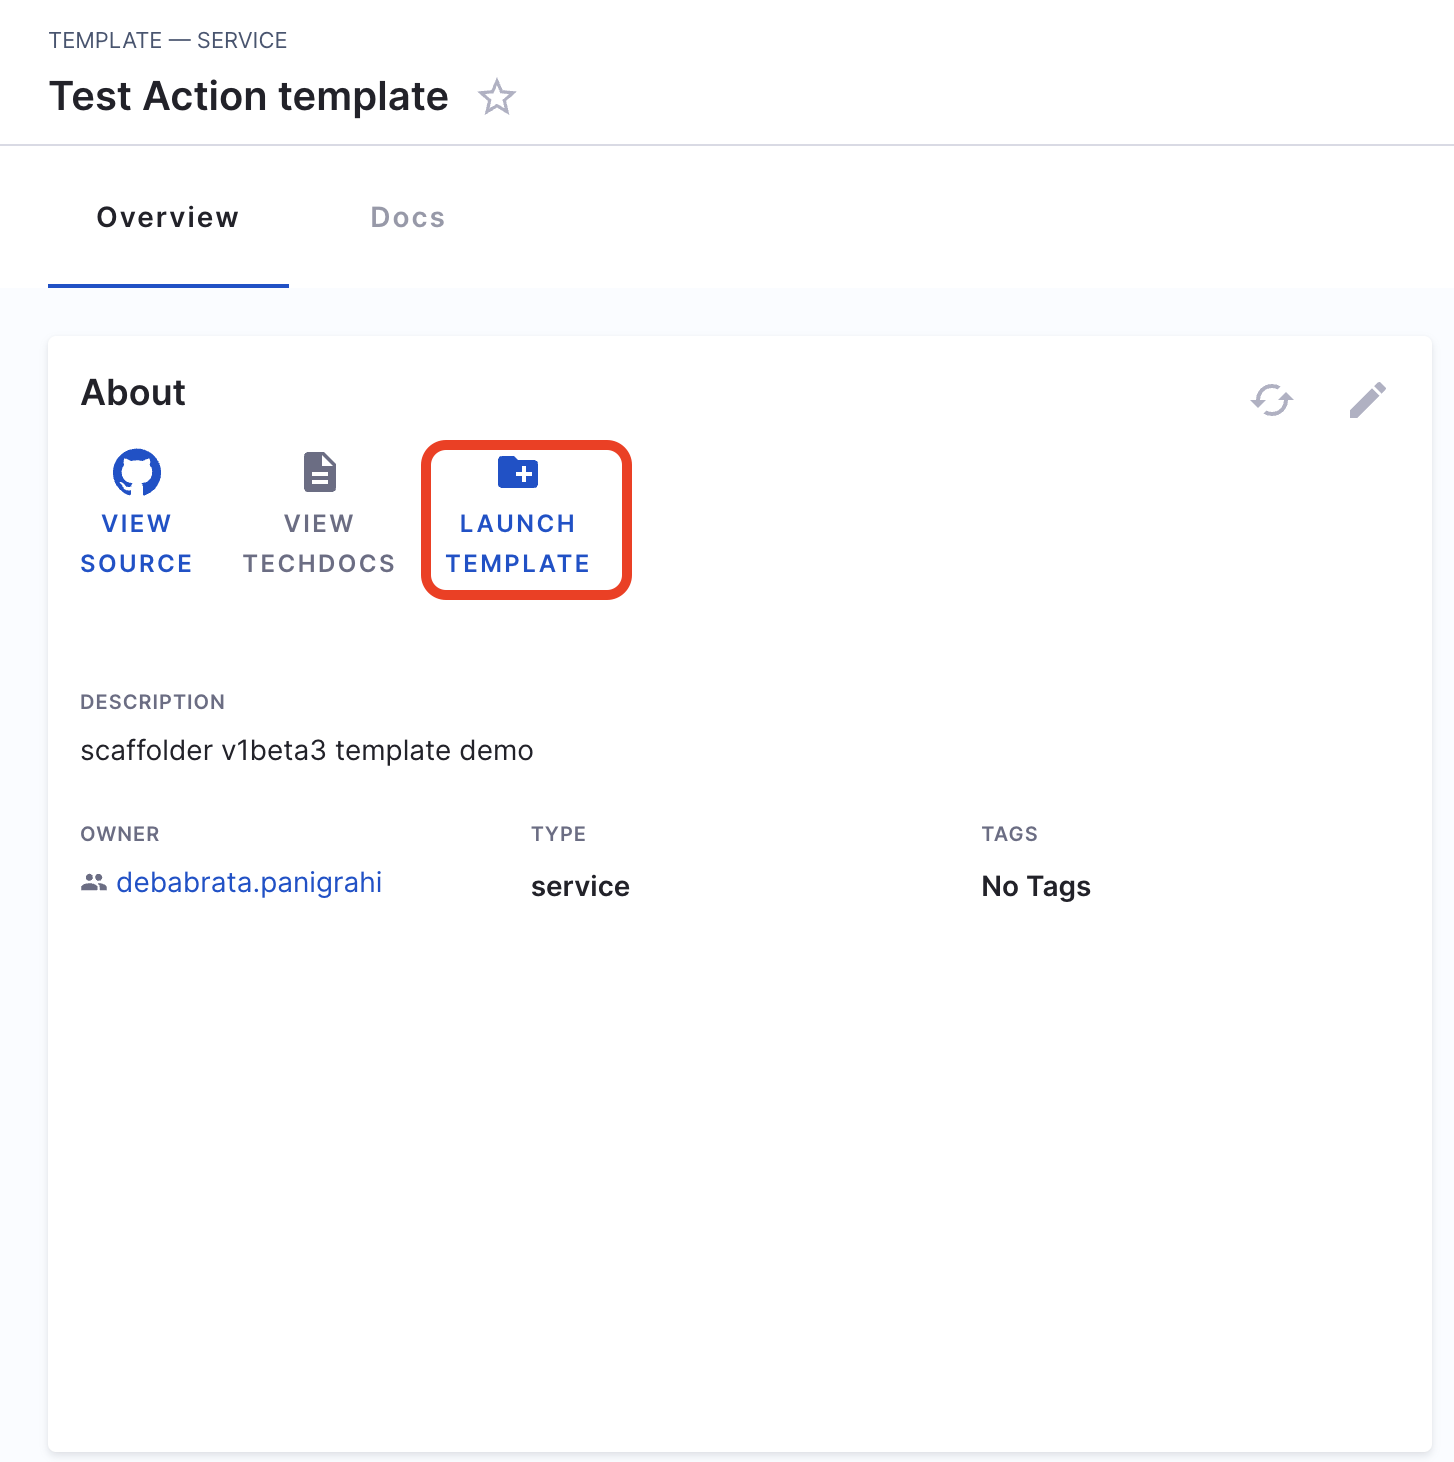
- Now fill the fields as:
- Repository Location: Add a name for the repository you wanted to create.
- GitHub Organization: Add the org where you want to add your new repository, usually GitHub URL are of the format
https://github.com/org_name/repo_name/
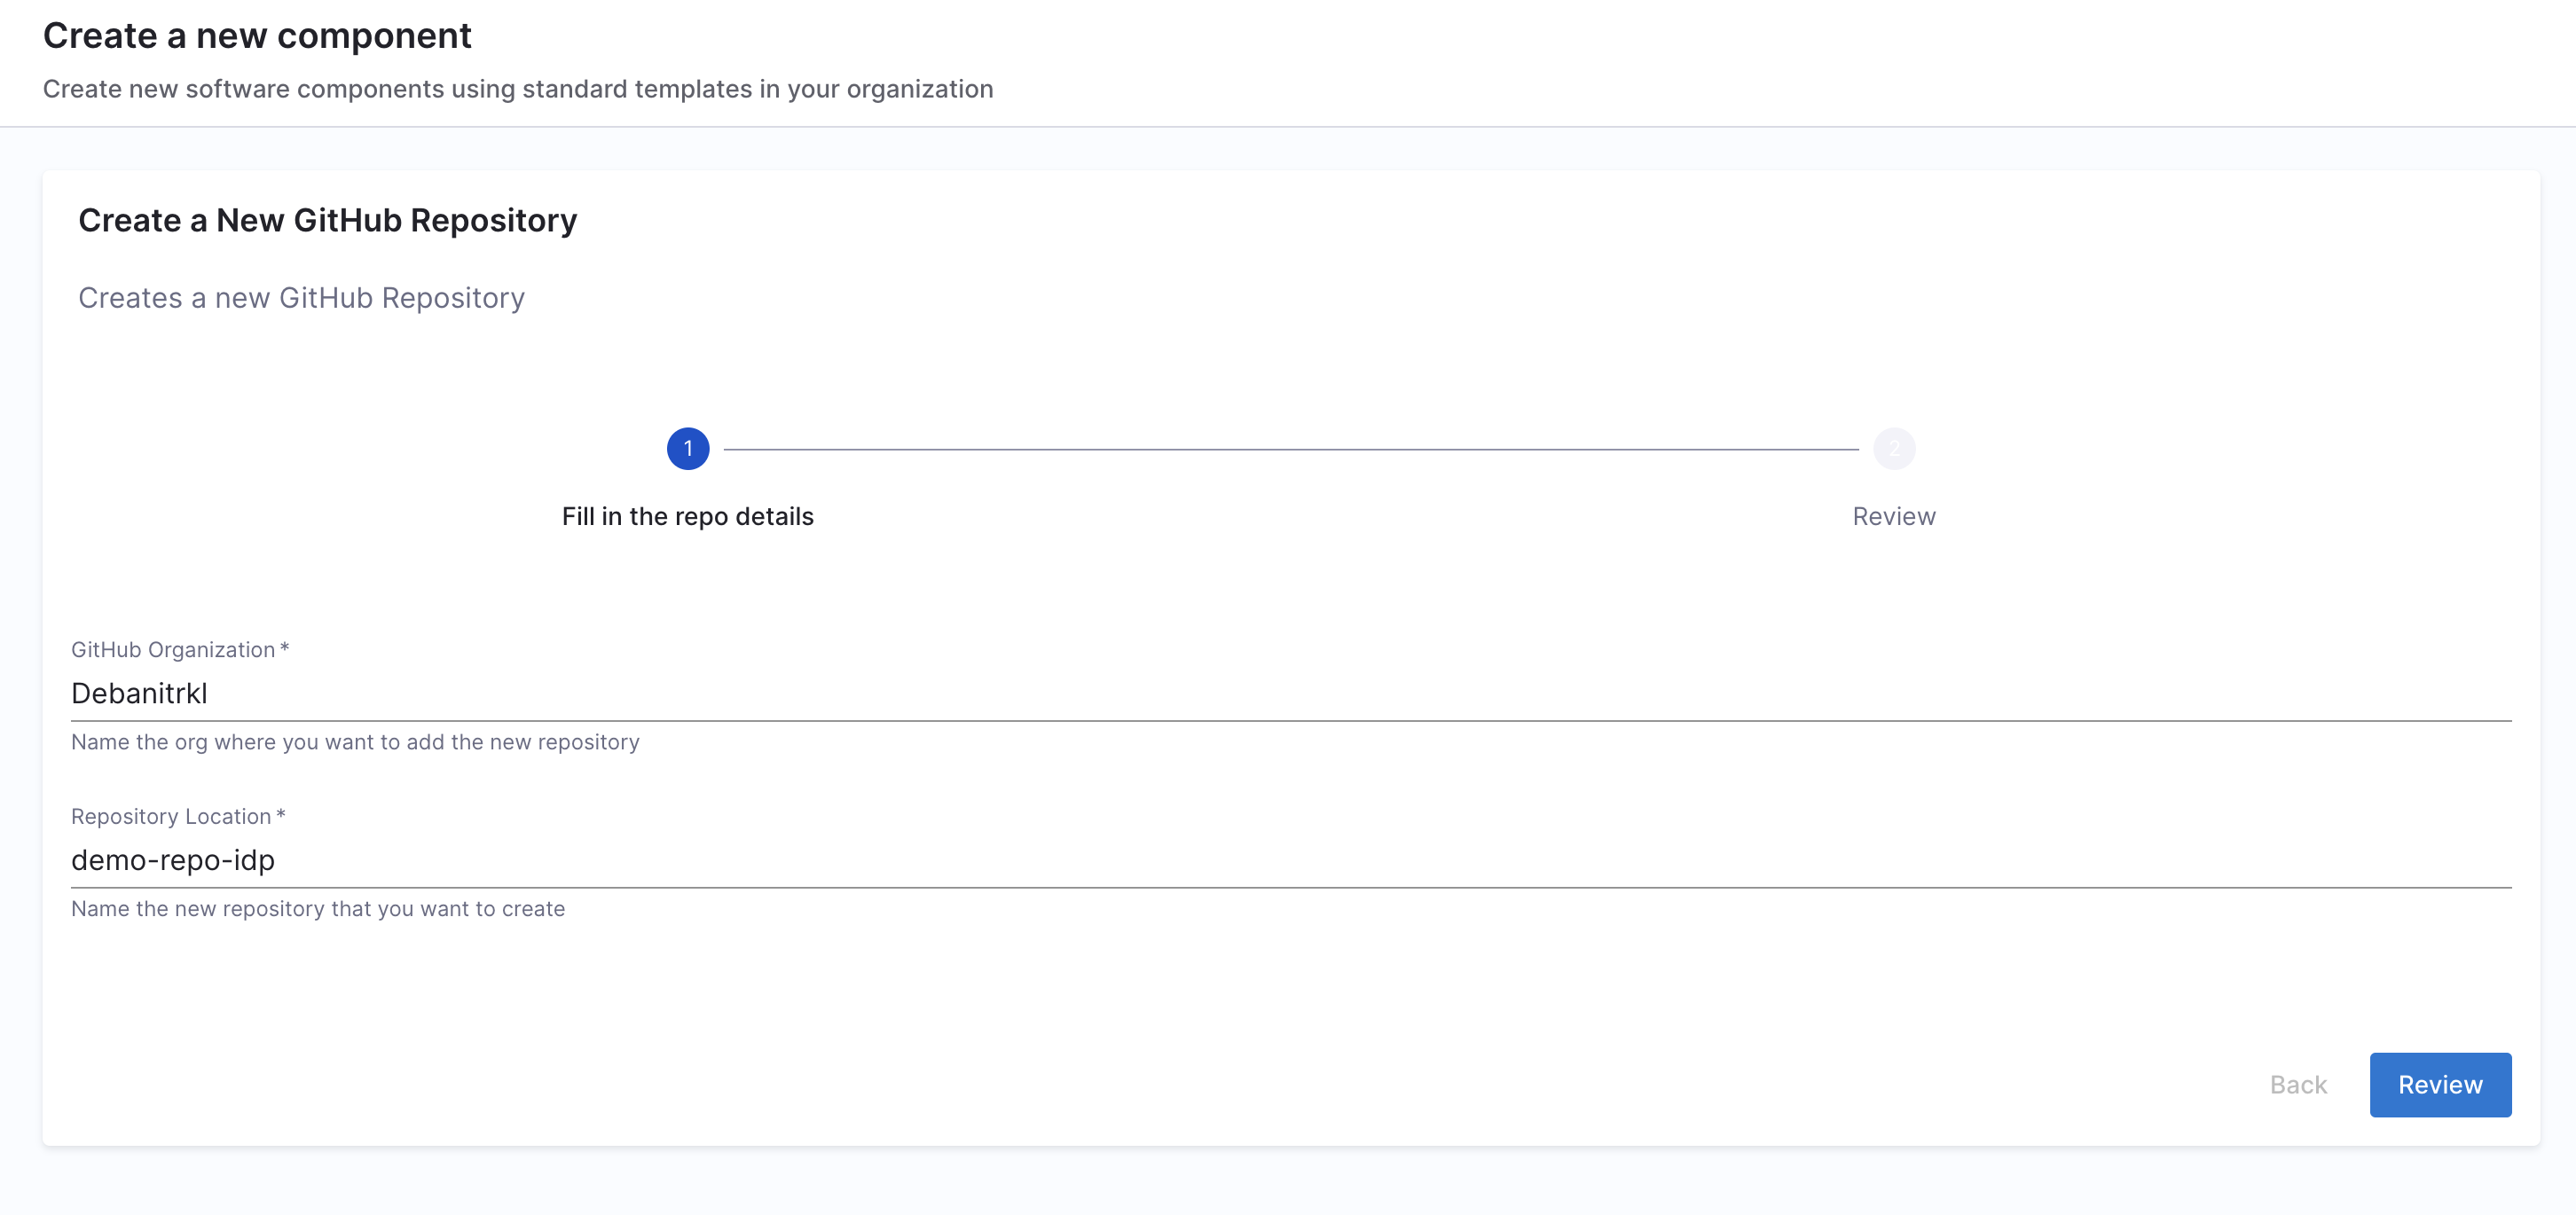
- Now Trigger the flow, it will create a new GitHub repo.
Delete the Workflow (IDP 1.0)
If you want to unregister or delete the Workflow follow the steps mentioned here.